Foreword
Current article is a 4th draft.
I also have an mpv guide for those who love to tweak, and an SVP4 guide for those who want to explore interpolation options for watching videos.
Table of Contents
Introduction
MPC-HC (original outdated build || forked & maintained build) is a classic video player with solid functionality. Not the prettiest thing in 2021, but function over form right?
For users that love tweaking, or users with potato PCs, I recommend using mpv instead.
For casual users, I recommend using MPC. It is easy to configure, and really user friendly. Performance may not be as efficient as mpv, but its ease of use and forgoing command line / config files in favor for a proper UI makes it the better choice for casual users.
MPC-HC is also very flexible with external components. One of the reason it has maintained its relevance after 17+ years is relying on external components/filters, allowing to decode modern formats despite its age.
MadVR is a powerful DirectShow renderer to to replace the antiquated enhanced video renderer from the Windows XP days. It is crucial to use MadVR as it not just provides powerful scalers and filtering functionality, but also fixes some errors with the default renderer (e.g. 10-bit video has incorrect pixelated chroma with the default renderer).
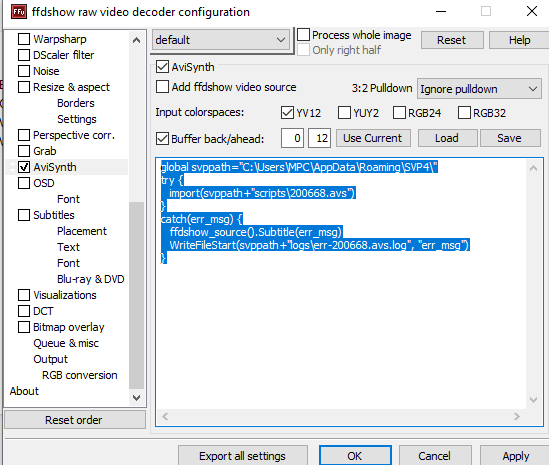
FFDShow allows MPC to interface with SVP 4 if you plan to use it. FFDshow also allows running custom scripts and AVISynth, but that’s advanced stuff and even I don’t touch it.
Please consult Google for audio options if you have a surround sound home theater. I only have headphones and stereo studio monitors.
Installation
There are many ways to install MPC-HC, ranging from codec packs to installing each component yourself. While my favorite way to install MPC-HC is via the K-Lite Codec Pack (K-Lite comes with a neat icon pack), I recommend avoiding using codec packs unless you are familiar with each components and know how to configure them properly. They are convenient but are also easy to install duplicate components and break rather easily if you don’t know what you’re doing. However, since I’m a hypocrite I’m using a codec pack anyways.
If you plan to use SVP 4, it actually also gives you the option to install MPC-HC and the required components within the installer. I recommend installing all the components with the SVP 4 installer so you don’t need to setup the FFDShow scripts (you can technically do it manually, but it’s a HUGE pain).
TL;DR: Install components manually if possible. If you’re lazy, just remember not to install duplicate components.
Bonus: Here is a video of me setting up my laptop with K-Lite + MadVR. You can follow along, but don’t copy everything I do since your system is different to mine. Finish reading this guide first, as I skip through many details in the video!
MPC-HC
Skip this section if you plan to use SVP.
MPC-HC officially has ceased development. However, you can find the community maintained releases here. Scroll down and get the x64 installer for the latest release build (avoid the dev build).
An alternative MPC-BE is also available. There are some slight differences, but setup should be similar. Nothing a Google search can’t solve though.
MadVR
Skip this section if you plan to use SVP.
MadVR can be installed by simply extracting the zip file to a safe location and running install.bat with admin rights. MadVR does not copy the files as it installs in whatever directory you have the folder extracted in.
SVP 4
Preface: I highly recommend using SVP 4 with mpv instead to save you lots of trouble.
SVP 4 can be easily installed with the installer. I recommend installing the core SVP programs and mpv. mpv will be a pre-configured VPY-enabled build in the SVP 4 installation directory, I recommend creating a ~\portable_config\ directory inside the mpv folder so you can run a separate mpv.conf. See my mpv setup guide to learn more.
Components to install (marked [x] are required components for the 64-bit MPC-HC to function):
+ [x] SVP Manager (Pro)
  + [x] [DS_64] Core for DirectShow 64-bit
  + [ ] [VPS_64] Core for Vapoursynth 64-bit (install if you also want mpv, recommended)
+ [ ] SVP Extensions
  + [ ] SVPcode (SVP transcoding tool)
  + [ ] SVPtube 2 (youtube-dl tool, recommended)
+ [x] 3rd-party software
  + [x] [DS32/64] AviSynth Filter
  + [x] [DS_64] ffdshow filters 64-bit
+ [x] 3rd-party software (optional)
  + [x] [DS_64] MPC-HC 64-bit
  + [x] [DS32/64] madVR video renderer
  + [ ] [DS32/64] LAV filter (MPC-HC provides built-in LAV, so no need to install unless you need it for specific purposes)
  + [ ] [VPS_64] mpv video player (install if you want mpv, recommended)
Read the guide on how to set it up.
Unfortunately some components installed are a bit older, you can try updating them by overwriting them and keeping the configs. It should work, although don’t quote me on this.
You can try installing components manually, but only do it if you’re confident you know how to set them up manually (need to manually link FFDShow Avisynth script to the SVP script as seen below). If you installed everything with SVP 4, this is all done automatically.
K-Lite Codec Pack
Ignore this section if you plan to use SVP.
There are lots of codec packs out there, but K-Lite is my favorite. Again, don’t touch codec packs unless you know what’s going on, or you’re very careful with them. They tend to “manage” things for you and sometimes break things.
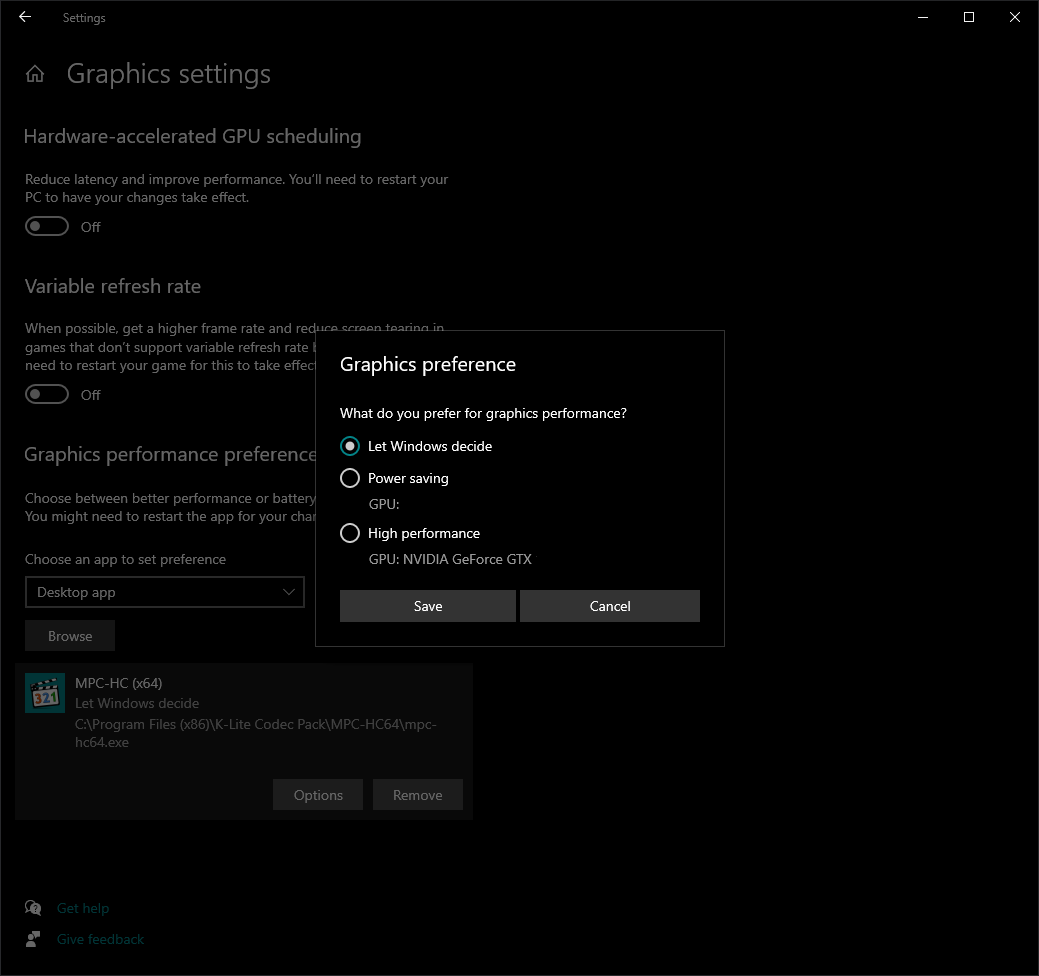
I recommend installing the Standard pack, then manually installing MadVR. K-Lite Codec Pack provides some useful tools and a neat icon pack with it. It even registers the app with Windows Graphics settings by default, so if you’re on a laptop you can go to the settings and force it to use your dedicated GPU.
MPC-HC Basic Setup
To open the options, select View -> Options on the Menu bar. This guide will assuming SVP 4 is NOT installed. If it is, there will be some differences (FFDShow stuff and script setup).
GPU Selection
If you have a laptop, you need to select your dedicated graphics for MPC-HC if you wish to use shaders and MadVR filters. I don’t have a laptop by me right now, but the power saving option in the screenshot should be the iGPU while the high performance option should be the dedicated GPU. You can find this option in Windows settings -> System -> Display -> (scroll down) Graphics Settings.
If you don’t see the app, you need to add the executable to the list.
Player
Player options should be self explanatory. Take your time to configure it to your liking.
Formats, Keys, Logo, Web Interface
Pretty self explanatory. Formats might be a bit frustrating to register the app as the default app. You will need to click Run as Admin, select video/audio/both, click done and done again, and then you can register MPC as the default app in Windows settings (thanks Microsoft! /s).
Keys are for shortcut keys. Make sure there are no duplicates!
Playback
Self explanatory options.
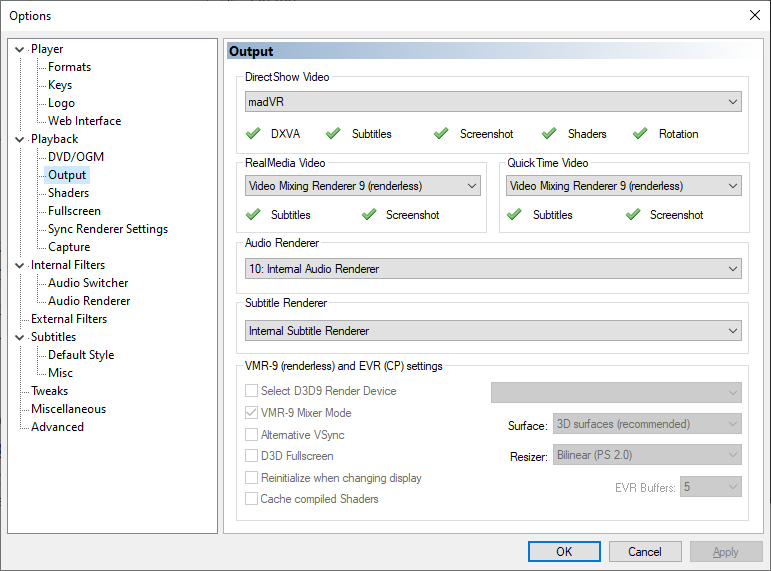
Output
Once you’ve got MadVR installed, you can switch Direct Show Video (1st option) to MadVR renderer. Leave the rest as defaults.
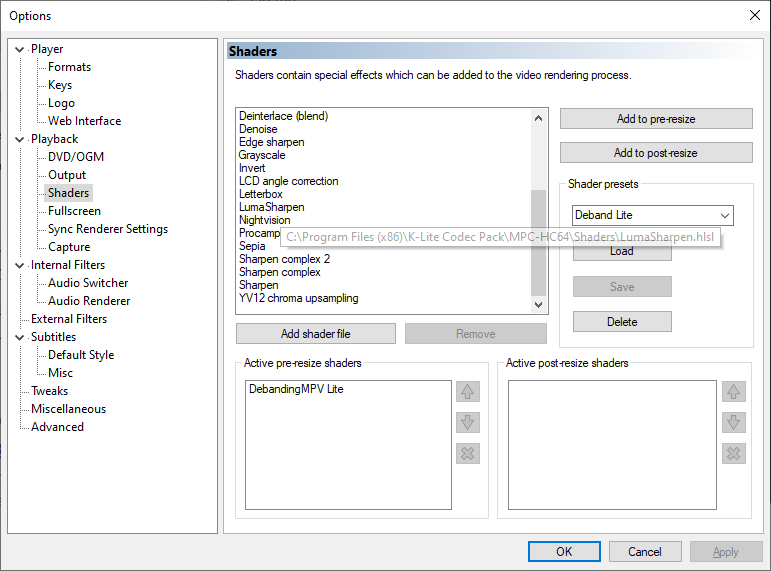
Shaders
Hover over the shader files to see where they are located. You can download my provided debanding shaders here (Hopefully copyright trolls don’t remove this link again). Extract the files to where all the other shaders are installed at.
You can create new presets and add shaders to both pre- and post-resize. Only add to pre-resize unless you know what you’re doing. Photo example is me creating a light deband preset and loading it to the pre-resize filter. Remember to click save to save the shader preset after configuring! If you’re confused see my video.
You can access preset shaders quickly via right clicking when watching a video. This should also allow you to see how effective the shader is (you can create a “blank” preset with no shaders, and toggle between profiles to see its effect).
Note that if you are on a new PC, or have never played games, you will need to install DirectX in order for shaders to work. Google “DirectX End-User Runtime Web Installer”, and don’t accidentally install the Bing bar.
Fullscreen
This allows the monitor to quickly switch refresh rate in fullscreen mode to match the source. I recommend not touching this, and use MadVR’s function instead if you want to change refresh rate of your monitor.
Internal Filters
The bottom 3 buttons allows access to LAV filter options. Note that these are the built-in LAV filters. If you installed MPC-HC via other means (e.g. codec pack), it’s possible that an external LAV filter has been installed. They can usually be accessed via system icons if they have been installed.
LAV filter config will be discussed later.
Audio Switcher/Renderer
Audio options. Consult other guides if you require advanced audio settings. The only relevant option here is the normalize filter, which imo should be disabled since it doesn’t work very well anyways. For music file normalization, MPC-HC supports replaygain tags, but just use a proper music player like Foobar2K at that point.
External Filters
Skip if you don’t plan to use SVP 4
Read the guide on how to setup FFDShow for SVP. Or just use the MPC-HC installed via SVP4, it’s setup by default.
Subtitles
Sub settings. Self explanatory. If you have a weak system, you can consider lowering subtitle animation frame rate (some fancier OP/ED have trouble rendering on weaker systems).
Tweaks and Misc
Self explanatory. Fast seek (keyframe) allows faster seeking, but since it uses keyframes some videos will seek rather far away from preset time. Disable fast seek if you must seek exact time defined in your jump distances.
Advanced
Don’t touch this unless you have a reason to.
To set max network streaming resolution, set YDLMaxHeight to the vertical resolution (e.g. 1080 for 1080p).
LAV Filters
See Internal Filters on how to access it.

Set Hardware Acceleration to DXVA2 copy-back if you plan to use external filters such as SVP 4. copy-back means the decode stream is copied into system memory.

Read guides if you need to know more about audio setup. For those like me using stereo, the default option should suffice. You may want to enable DRC so downmixing surround sound streams won’t have abrupt loudness.

1f0.de has explanations for advanced options. Explanation of my setup:
jpn:eng loads eng subs for jpn audio as top priority. (I technically don’t need this first line due to my 2nd line, but I’m too lazy to edit it).
*:eng loads eng subs for any audio as 2nd priority.
*:*|d loads anything, preferably anything marked as default as 3rd priority.
; is a separator.
MadVR
Go to system tray and double click MadVR icon to open settings.
Note: Ctrl+j allows you to monitor decode info for dropped frames (make sure to set MadVR as your renderer first!). Remember to also monitor system usage, and try not to exceed ~70% CPU/GPU usage if possible. Do note that AV1 decoding and HDR tone mapping uses a TON of resources.
Devices
In device settings you can access monitor related settings. Adjust settings to your appropriate device (i.e. PC or TV color levels, HDR settings, etc.). You can also access monitor refresh rate settings here, though if you are not using SVP there really isn’t much reason to use this. If you aren’t sure, leave them as default.


Click on your device and set its device type from unknown to whatever it is (typically Digital Monitor/TV). Expand the menu and go to properties. If you have a computer monitor, make sure it’s on PC levels (0-255). If you have a TV, you might need to test it since lots of TVs have a PC mode these days. The Lagom black level test should let you know which mode your TV is running in. Set your TV to its brightest, and see if you can see the all the squares displayed. The correct mode should allow you to see all squares (1st row is very subtle so widen your eyes).

One important setting is the calibration of your monitor if you have a wide gamut display. Ideally you want to setup with custom 3DLut, but proper equipment is expensive. If you know your screen is close to DCI-P3, you can just set your calibration to assume a DCI-P3 monitor. This fixes oversaturation issues on BT.709 videos (which pretty much 99% of the videos out there are).
Note that if you apply gamut clamping/remap, screenshots will look unsaturated on sRGB devices as they are color clamped to display sRGB values on a wide-gamut color space. (i.e. red [255,0,0] on sRGB/BT.709 will be clamped to [233,54,40] in DCI-P3)

Display modes allows you to switch monitor supported refresh rates in certain conditions. Back when I used SVP with a 60Hz monitor, I had MadVR change to 48Hz (custom res setup in Nvidia Panel) in full screen. This section is irrelevant for people with high refresh monitors.

If you don’t have a true HDR display (such as the useless HDR 400), I recommend setting MadVR to tone map using pixel shaders instead of the default passthrough. HDR on HDR 400 displays look like crap.
Processing

Activate auto deinterlacing if you watch ancient DVD content. Otherwise, turn it off as Anime sometimes triggers false positives.

For debanding, I recommend the light filter for my provided hlsl (see shaders on how to set it up) and only use Medium/Strong for WEB or older content. For MadVR deband, I recommend Medium strength + High Fade-In/Out for Anime. (ONLY choose one debanding filter to use, not both!)
Artifact removal:
- If you don’t plan on using my provided deband shader, feel free to use the MadVR one. I prefer the mpv ported one as imo it’s the best written deband shader out there.
- Reduce compression artifacts can be use if you mainly stream your anime from Crunchyroll or other Web sources. Useful but GPU intensive!
- Reduce random noise helps remove some dynamic grain and video noise. Useful but GPU intensive (especially if chroma filtering is selected)!
I prefer not using filters due to GPU usage (I watch videos while doing other stuff), though I found setting reduce random noise (no chroma, strength 1) to be rather pleasant at removing film camera noise and injected noise from anime BDs. I recommend enabling reduce random noise (str 1 no chroma) if you don’t multitask like I do and find film/injected grain to be unpleasant. If that’s too strong, simply enabling reduce compression artifacts str 1 is also nice as it only filters extreme cases.

Image enhancement setting here is global. I recommend using image enhancements in the upscale refinement tab (discussed later) for upscales only.
Scaling Algorithms

Chroma Upscaling: Jinc should be sufficient for mid-ranged GPU. Only use NGU if you got a really high end GPU and require 2x resolution. Spline is a good quality fallback that uses much less resource usage compared to Jinc. Stick with Bilinear if you have a potato PC. Remember to activate anti-ringing filter when applicable.
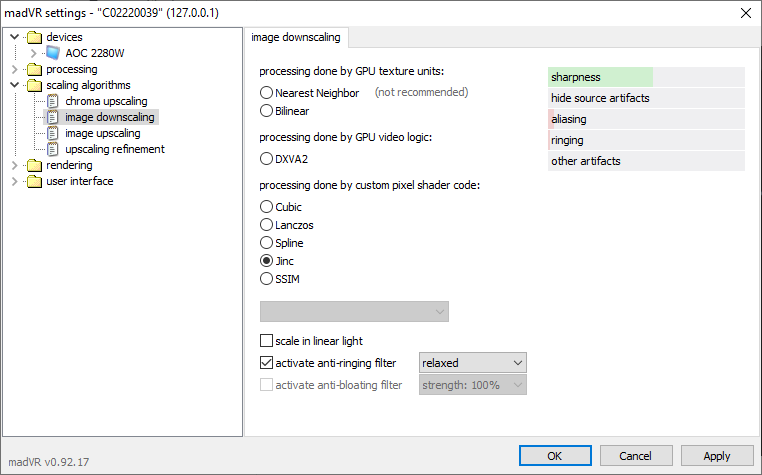
Image Downscaling: SSIM for decent systems. Otherwise Lanczos or Spline are good fallbacks. Honestly even Bilinear is fine, as there aren’t many situations where you’ll downscale videos. The only scenario I can think of is stuffing the window in the corner background playback while doing other stuff, in which case quality isn’t important.

Image Upscaling: Most important, spend your GPU resource here first. Bilinear for potato PCs. Bicubic75 for iGPU systems if able. Spline for weak systems. Jinc for mid-end GPUs. NGU for higher-end systems that require resolution doubling (1080p -> 4K). Remember to activate anti-ringing filter when applicable.
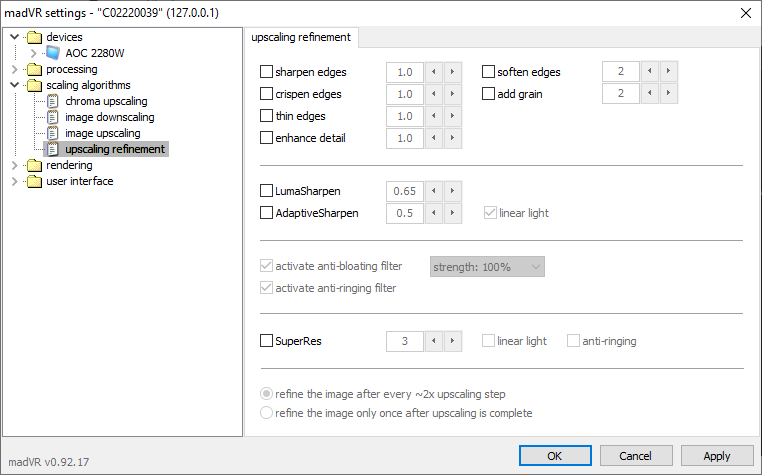
Upscale Refinement: Post-upscale filtering. Some people like it, some don’t. Personally am not a fan. For anime, Adaptive Sharpen and Thin or Crispen edges should be the most relevant settings. Personally Adaptive sharpen (0.5) + Thin Edges (1.0) + both anti-bloat(100%)/ringing filter looks good on most slow-paced anime.
Deep Dive into Scaling Algorithms
Explaining each algorithm in detail is going to take too much time. Instead, let me redirect you to my mpv external-shaders guide for more info. Scroll down to the upscalers demo. I’ll explain the relevant ones:
ewa_lanczos is Jinc-functioned Jinc, a.k.a Jinc. mpv also has a sharp and soft tweaked variant but MadVR only has the default one. Jinc is probably as good as it gets without getting into more advanced NN scalers. Recommended to use in mid-ranged GPUs (GTX 1650 or better).
Next in line is spline. MadVR’s spline 3-tap should be spline36, and 4-tap should be spline64. Much lower system resource and close in quality to Jinc with a tad bit more ringing artifacts. Recommended to use in entry-level GPUs (~GTX 1050 tier).
MadVR has the ability to use various Bicubic upscalers. I like to use Bicubic75 for my iGPU laptops, but other sharper variants also exist. Bicubic is 1 step down from spline is suitable for laptops with iGPUs if spline is unable to run smoothly. Some older (e.g. 1st gen 4K laptops) might still struggle with Bicubic75.
Bilinear or DXVA2 can be used on potato PCs.
NGU is a proprietary doubling (2x) scaler. The sharp variant is similar to FSRCNNX. AA variant is similar to NNEDI3. Standard is in the middle and my personal recommendation. I recommend NOT using NGU unless you can run it at high or very high quality without dropping frames.
Resource Prioritization
CPU/GPU resource is limited, and putting them where it impacts the most is the most important. Here is my flowchart:
| Img Upscl | Chroma Upscl. | Img DwnScl. | Img/Artifact Enhc. | |
|---|---|---|---|---|
| Potato | Bilinear | Bilinear | Bilinear | None |
| iGPU Laptops | Bicubic75 | Bilinear | Bilinear | None |
| Modern Laptops ~ GTX 1030+ Tier | Spline | Bicubic | Bilinear | None |
| ~ GTX 1650 | Jinc | Spline | Bilinear | Single/Simple Option |
| ~ RTX 2060 | Jinc | Jinc | Lanczos | Moderate Options |
| ~ RTX 2060 Alternate | NGU | Jinc | SSIM | Lightweight Options |
| Powerful Systems | Sky | Is | The | Limit |
Rendering
General rendering options. Leave at default for the most part.
Leave Smooth Motion off, if you want interpolation get SVP.
Dither – I prefer Ordered Dithering.
Trade Quality for Performance – Not as a huge impact you might realize. It’s not gonna magically make your potato play 4K videos.
Conclusion
Thanks for reading!
Here’s a small tip for beginners: Simple is best. I find many beginners setting up a gazillion filters in their quest to improve “video quality”, only to make it worse. Here are my steps to setting up your video player:
- Setup upscaling algorithms. If satisfied, stop. If not, move on to…
- Deband. You’re most likely going to notice banding after setting up scaling to your liking. Either use MadVR’s built-in deband, or the provided hlsl deband filter ported from mpv. Next…
- < Most poeple should stop here, as starting here we get to more destructive filters >
- Denoise. Reduce random noise can remove annoying camera film grain or injected dynamic grain. If you feel that it is too strong, use reduce compression artifacts to do light denoising removing jpeg-like artifacts caused from compression. Lastly…
- Use a reasonable amount of filtering. A light thin-edges + adaptive sharpen should be sufficient for most content. Please don’t be THAT guy with every filter enabled.

Thanks for the guide, I was looking for this after getting a new PC, but the problem I am getting is that the screen won’t shrink when I only want half size of the screen, like a split when you have to work on something while watching the anime. MPCHC has never done this before, as if the screen stays 100% size even when you shrink it 50%, do you know how to adjust the setting for this? Please let me know, thanks!
LikeLike
View -> Video Frame -> Select “Touch Window From Insode”
LikeLiked by 1 person
Thanks, that fixed it. I also noticed the subtitle is rather blurry, I am not sure if it was done that way by the TL group or if there is something in the settings I can change. Do you know anything about that? Thanks again.
LikeLike
I am so sorry, I checked the subtitle setting again and made sure to upscale the resolution, clear as brand new glass window now, thanks for the wonderful guide, I will leave note here if I have more concerns! Great work.
LikeLike
Another question. The MPC I used before recognizes soft sub and makes the sub goes away the moment I enter or exit full screen mode, but the MPC I set up here does not do that. Is there something in the settings I can maybe change? I notice MPCBE was the same as well, I tested using a soft sub file.
LikeLike
sorry, any idea on this? also, is there a way for mpchc to load 2 subtitles at once? the fansub group breaks the subs into parts for the opening song/ signs and parts for the main show, MX player on my android can load both subtitles at once but I am not sure how to do the same for mpchc on a PC. Any tip would be great, thanks!
LikeLike
Not sure. Fansubs that are split typically have 1 track for OP/ED and another for combined so this typically isn’t an issue.
LikeLike
https://anime.my/tutorials/watching-h264-videos-using-compute-unified-device-architecture-cuda/ this might be a good place to get madvr+mpc-hc as well. The builds are kept up-to-date, with a lot of presets.
LikeLike
Thank you so much for this it helped me alot.
I have one more issue that I can’t figure out. Anime files usually have 2 subtitle tracks, one for the dialogue and one for signs (used for the dub) but because both of them are marked as eng the signs sub ends being the chosen sub instead of the dialogue one which is what I want it to choose.
It would be awesome if you know how I can make the dialogue sub the prefered one. Please let me know if you do!
LikeLike
Unfortunately the first track is chosen if there are multiple of the same language. It just happens that signs are always the track before that. A workaround is to enable loading [default] tagged subs as priority, and manually tag the full subtitle as the default track using tools that can manipulate tags.
LikeLike
Is there an easy way to tag subtitles in MPC itself? If not I’ll just settle for the default priority setting. Thanks for replying.
LikeLike
You need external tool I believe. MkvtoolnixGUI is a bit unintuitive for beginners. There are other tools for batch operation but they require a bit understanding of how tags work and command line.
LikeLike
During K-lite codec pack install I ran into this option:
“Audio bitstreaming to external device:”
which defaults to disabled
I use an external DAC and AMP, should this be enabled instead?
LikeLike
Probably not. I think this might be referring to SPDIF or HDMI? No clue.
LikeLike
I am not sure what you mean by external DAC and AMP, if you mean you are using a hometheater processor, also called a pre-pro, as DAC and a separate multichannel amp, you will wan’t to use bitstreaming.
Bitstreaming enables the sending of (In practice) unaltered copies of multichannel stream data for transfering multichannel audio to your home theater equipment in the formats Dolby Digital (Incl Dolby Digital-EX 6.1)/AC3 tracks and Dolby Digital +/Dolby Digital Plus/EAC3 tracks and Dolby TrueHD tracks plus DTS (Incl DTS-ES 6.1) and DTS-HR/DTS-HD MA with as many channels allowed by the format, usually 5.1 or 7.1, and sometimes the stream carry Dolby ATMOS or DTS-X audio object information as well.
So if you’re “DAC” can decode the multichannel formats mentioned above in the DAC itself, you definitely want bitstreaming on.
An AV Receiver or a Home Theater Processor/Pre-Pro + one or several multichannel amps connected to a computer
– by Optical/TOSLINK or Coaxial digital inputs will only be able to receive Dolby Digital (Incl DD-EX) and DTS (Incl DTS-ES) – with the exception of a very limited amount of equipment that can also receive Dolby Digital + (which actually is out of spec but works on a few devices still).
– by HDMI will be able to receive all the abovementioned audio formats in an unaltered stream to a separate AV Receiver, although if I remember correctly Dolby Digital +, Dolby TrueHD and DTS-HR/DTS-HD MA needs HDMI 1.4 to transfer these formats.
Channel panning and sound placement is usually much better done by a decent AV Receiver or a high end HT Processor and Multichannel amp(s) than by letting the PC decode let’s say a DTS 5.1 track to PCM and sending the multichannel PCM to the receiver.
PS. Since for some reason AAC/HE-AAC/HE-AAC v2 (Which no AV Receiver or HT Processor no matter how expensive can decode) has become a really popular codec on downloads also note that ffdshow allows you to transfer muiltichannel AAC 5.1 over a TOSLINK or Coaxial output by decoding the AAC and recoding it to Dolby Digital 5.1 @ 640 kbps.
A better way is to use LAVFilters or whatever and let it decode the AAC 5.1 or 7.1 and send it as LPCM 5.1 or 7.1 over HDMI since you will always get some quality losses when deocding and then redocding to anon-lossless format (AC3 and DTS is non-lossless but LPCM is lossless).
LikeLike
I’ve got the latest MPC-HC (as at 26/09/21) installed as well as MadVR but when I play 4K HDR movies it is still all washed out. I also added MadVR to the external filters but it made no change – I don’t really enough about all these options and filters etc so is there something else I need to do to fix this issue? Am I supposed to add one or more LAV filters as well? If so which ones, I can’t tell from the above article what these are actually supposed to do.
Also, when I got into Options -> Playback- > Output I can see that “Subtitles” has a red cross next to it and I cant change that. All other install guides for madVR show this option is ticked by default but mine is not – again, any idea why?
Hope you can help – thanks for a great article!
LikeLike
You need to configure MadVR to always tone map on your monitor. By default it should tone map but if you have a monitor that claims to have “HDR” but really it doesn’t that may be why.
No clue about the check mark. If subtitles work fine then just ignore it.
LikeLike
Sorry to bother again. I notice the frame rate when skipping is too much, I press once the Right arrow key to fast forward and it jumped several seconds longer than I wanted, can you direct me where to change that in the settings please? I just want to rewind a little bit, not that much, but I am not sure where to check and would rather not screw around with any advanced setting 😦
LikeLike
Disable fast seek for MPC. Note that if you have a slower PC disabling fast seek will make it feel “laggy” when seeking.
LikeLike
Now where in the setting would I find that? I’ll look for it but just in case I cant find it anywhere, thanks.
LikeLike
ok, I found and uncheck the box labelled Fast Seek, but still rewind and fast forward still jump close to 5sec, it is too far of a jump, any way to shorten it? That is what I was really asking. Thanks.
LikeLike
You need to set the skip distance. Forgot where it is. There’s a short/medium/large skip which can be configured. See hotkeys setting to see which you are currently using and change the appropriate one.
LikeLike
I messed with some settings and now my playback is lagging . I want to reset my Madvr settings to default how it was when i installed it for the first time, but i dont know how. Please help.
LikeLike
Run the restore defaults bat file in the MadVR directory
LikeLiked by 1 person
mediafire for shaders is down!
LikeLike
I’ll fix it later. Freakin copyright trolls.
LikeLike
Using the provided deband shader, at the bottom of MPC, it says “Failed to set pre-resize shaders” Is that normal?
LikeLike
Had the same problem on a new laptop. You’re missing some DirectX runtime, which hlsl shader requires. Just install the latest DirectX drivers from Microsoft and you should be fine.
EDIT: It’s called the “DirectX End-User Runtime Web Installer”
LikeLike
Thanks for the guide! How many dropped frames is acceptable? I’ve got 3070 with i7 10700kf and using highest settings you recommended with madvr without any deband shaders and getting around 10 dropped frames, is this accetpable or should I try lower?
LikeLike
Depends on how much you can accept. Other then loading or fast forwarding, you really should avoid dropping frames though.
The dropped frames is cumulative so if it stops at 10 after loading in the video you should be fine.
LikeLike
wonderful write up, thank you for this
LikeLike
hello i have svp project mpc player i have a question will gtx 1660 graphics card do upcaling real time staram 720p – 4k?
LikeLike
Depends, but if you didn’t set anything insane in MadVR you should easily upscale 60fps.
LikeLike
Have you toyed with MPC VR instead of MadVR? Any differences? Worth switching over?
LikeLike
It should work fine if you don’t need any fancy features.
LikeLike
Thanks for this guide. Really appreciated your advice
LikeLike
Nice blog! Thanks for such a detailed guide. I have setup madvr like your description and I never knew 1080p can look this good on a 4k screen. However I have a slight problem with the audio. Whenever I watch any movies I can’t hear the dialogues and bg music but all other sounds are loud so when I increase the volume to hear the dialogues everything else is super loud. Do you know why it might be happening? I have a stereo system with a subwoofer
LikeLike
You want to listen to the dedicated 2 channel mix. 5.1/7.1 mixdown will result in really loud sound and drowned out dialogue. If your content does not have a dedicated 2.0 track, you can try boosting center channel and see if that helps. Another less optimal alternative is to just setup the player to only play the left, right, and center channel, though you might lose some sounds doing it this way.
LikeLike
Ah makes sense. Thanks I’ll try it tonight
LikeLike
Can you consider rewriting those debanding shaders to work with Direct3D 11?
LikeLike
I didn’t write them, but from my limited knowledge there shouldn’t be any significant benefits porting it into a newer version unless your PC somehow doesn’t support DX9.
LikeLike
Direct3D 11 has performance improvements generally speaking, but the shaders fail to set with it.
LikeLike
Well yeah, the hlsl is v3.0 which is written for dx9. There might be new functions in dx11 available to improve the script performance, but a quick glance at the code is just some basic linear algebra, random noise generation, and permutations. If you have trouble with dx9, I don’t think dx11 is gonna help.
LikeLike
Your video got removed, do you have any archive of it that you can post?
LikeLike
Unfortunately no 😦
It was removed for some sort of piracy violation, no clue.
LikeLike