Forewords
I also have a guide for setting up MPC-HC and MadVR if you’re less into tweaking. Other then being slightly less resource efficient at the lower end, imo MPC paired with MadVR is just way more convenient to use.
Table of Contents
- GPU Selection
- General mpv Options
- Video Config
- Audio Config
- Subtitle Config
- Advanced Video Scaling Config
- Personal mpv.conf file
- input.conf Config
These are my recommended settings. Adjust the settings suitable to your system.
Get mpv at mpv.io or custom mpv build w/ vpy enabled configured by me. Just extract the archive to a desired directory. I recommend not using a directory that requires admin/superuser privileges. For Windows, an install script should be included but is not required, as all it does is register mpv for file association. For Mac, there’s also IINA which has a prettier UI although some advanced options may not work and may require more tweaking for power users.
The mpv.conf file can be found in %APPDATA%\mpv on Windows and ~/.config/mpv/ for Linux/Mac. Alternatively, \portable_config\ folder can be used in the mpv executable directory on Windows to make it portable, and will take highest priority over %APPDATA%\mpv.
Read the documentation for all available commands.
To illustrate how the config file works:
# This is a comment.
#inactive-config
active-config # This is a comment.
active-option-value=111
active-option-value=222 # active-option-value is now set to 222 instead of 111.
Anything behind a # is disregarded by the program as a comment and is inactive. Anytime you write a new line that is present already, it overrides it. This means if you write scale=ewa_lanczossharp, then in the next line write profile=gpu-hq, the scale=spline36 from the gpu-hq profile will override the settings you set earlier.
If you are still using notepad to edit files, I recommend using VSCode, Notepad++ or similar software to edit config files to make your life easier.
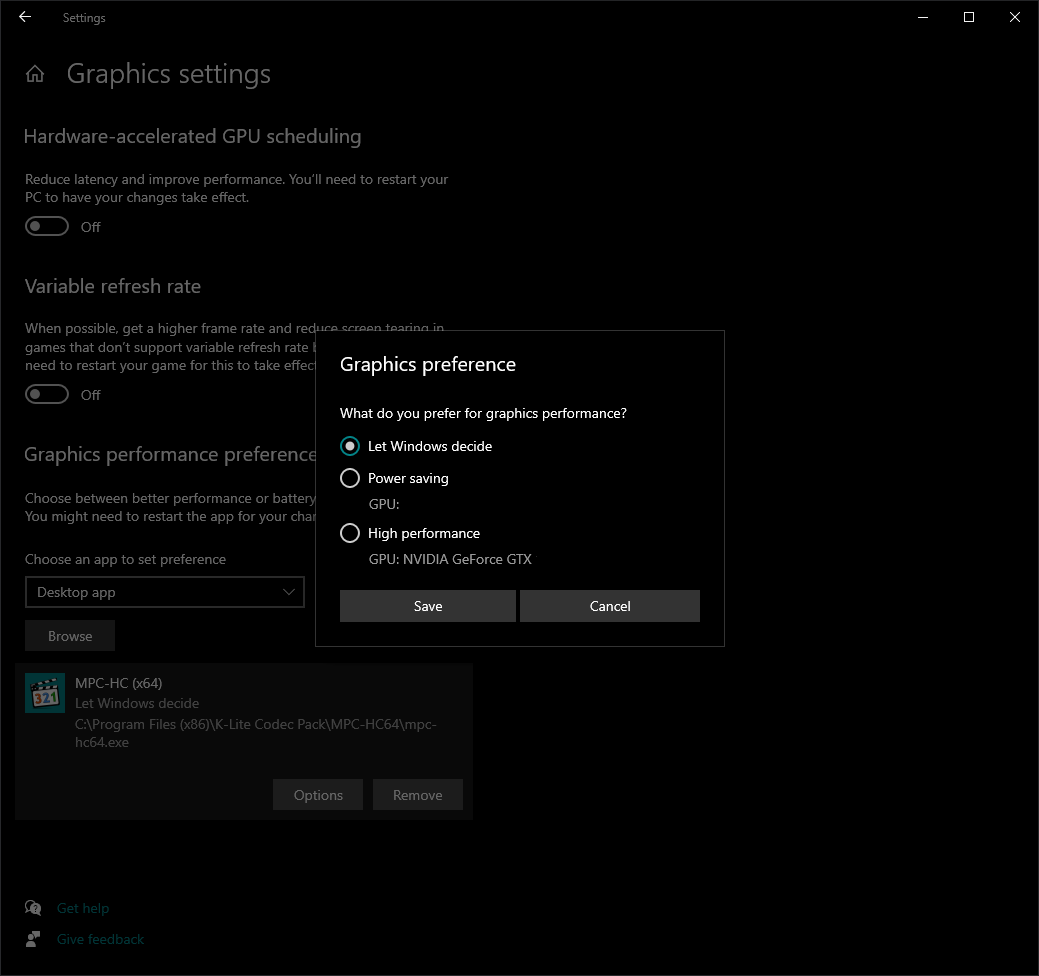
GPU Selection
If you have a laptop, you need to select your dedicated graphics for mpv if you wish to use advanced filters/scalers. I don’t have a laptop by me right now, but the power saving option in the screenshot should be the iGPU while the high performance option should be the dedicated GPU.
You need to add the executable to the list if you don’t see it (mpv.exe).
General mpv Options
Enable this section if you use SVP 4, requires Vapoursynth mpv build.
I also have an SVP 4 guide if you’re interested.
#input-ipc-server=/tmp/mpvsocket # *nix only
input-ipc-server=mpvpipe # Windows only
hwdec=auto-copy
hwdec-codecs=all
hr-seek-framedrop=no
no-resume-playback
Built-in high quality profile. Enables better upscaling algorithm. Recommend GPU minimum of newer Intel Iris iGPU, AMD VEGA 8 iGPU, or NVidia MX150. Add this option at the beginning of the file to prevent overriding options!
profile=gpu-hq
(Optional) Enabled newer Vulkan API. Disable if compatibility/performance issue. May improve performance when running complex shaders. Default has been updated to use 3D311. Set to opengl if you’re having issues.
gpu-api=vulkan
Setup proper color profile to prevent oversaturation on high-gamut monitors. Many IPS monitors these days can achieve near DCI-P3 performance and look oversaturated, especially with the reds/greens. (Oversaturation is pretty on nature videos, but makes human skin look odd and gets old real quick.) If you can calibrate the monitor to get an icc profile, use it. If not, you can set a target primary if you know your display color gamut. Only enable 1 option!
icc-profile="C:\Windows\System32\spool\drivers\color\Example.icc" # Use defined icc file
#icc-profile-auto # Use this if your system has a default icc profile setup already.
#target-prim=dci-p3 # Use this if you don't have a calibrated icc profile, but know your monitor's gamut
Override default language selection order:
alang = 'jpn,jp,eng,en'
slang = 'eng,en,enUS' # enUS for Crunchyroll.
Some other UI options:
keep-open=always # Prevents autoplay playlists. Set to 'yes' to autoload. Both "always" and "yes" prevents player from auto closing upon playback complete.
reset-on-next-file=pause # Resumes playback when skip to next file

window-scale=1 # Set video zoom factor. (High DPI screens want 1.5 or even 2)
autofit-larger=1920x1080 # Set max window size. Can also set something like "75%" to mean max window size is 75% of screen height/width
autofit-smaller=858x480 # Set min window size.

no-osd-bar # Hide OSD bar when seeking.
osd-duration=500 # Hide OSD text after x ms.
osd-font='Trebuchet MS'
#osd-font-size=24
If you have a custom osc.lua, enable this or you will be playing loading roulette with a different or broken OSD every time you open mpv.
osc=no # Disables default OSD. Use this option ONLY if you have a custom osc.lua
Configure network/youtube-dl options:
ytdl-format=bestvideo[height<=?1080]+bestaudio/best # Set max streaming quality as 1080p.
# Default demuxer is 150/75 MB, note that this uses RAM so set a reasonable amount.
demuxer-max-bytes=150000000 # 150MB, Max pre-load for network streams (1 MiB = 1048576 Bytes).
demuxer-max-back-bytes=75000000 # 75MB, Max loaded video kept after playback.
force-seekable=yes # Force stream to be seekable even if disabled.
Screenshot:
screenshot-format=png
screenshot-high-bit-depth=yes
screenshot-png-compression=7 # Setting too high may lag the PC on weaker systems. Recommend 3 (weak systems) or 7.
screenshot-directory="%USERPROFILE%\Pictures\mpv"
Video Config
Denoise filter. Recommend keeping it off unless watching CRT era stuff. (May not work, filter requires vo=vdpau or vo=gpu. See doc.)
#denoise=1
Deband filter. Always turn on for anime. Turned on by default if profile=gpu-hq is set.
deband=yes # Default values are 1:64:16:48
Deband parameters configuration. For Anime, 2:35:20:5 recommended for general use. Use 3:45:25:15 for older DVD, badly mastered BD or WEB streams. Use 4:60:30:30 for really, really bad streams.
deband-iterations=2 # Range 1-16. Higher = better quality but more GPU usage. >5 is redundant.
deband-threshold=35 # Range 0-4096. Deband strength.
deband-range=20 # Range 1-64. Range of deband. Too high may destroy details.
deband-grain=5 # Range 0-4096. Inject grain to cover up bad banding, higher value needed for poor sources.
Note: For older/weaker iGPUs, instead of increasing deband-iterations you may need to increase deband-threshold instead if you need a stronger effect. I recommend 1:60:25:30 if you absolutely must run 1 iteration (lower quality but much less GPU usage).
Dither:
Set to auto for Anime due to 8 and 10 bit encodes. Set to no if your monitor has built-in dither (just leave it at auto if you aren’t sure).
dither-depth=auto
Audio Config
volume=100 # Set volume to 100% on startup.
volume-max=100 # Set player max vol to 100%.
Subtitle Config
Enable if subs are broken or you need legacy ssa support.
demuxer-mkv-subtitle-preroll=yes
#sub-ass-vsfilter-blur-compat=yes
#sub-fix-timing=yes
Enable to modify PGS subs.
#sub-gauss=0.5 # Blur PGS subs.
#sub-gray=yes # Monochrome subs (makes yellow font grey).
Allow loading external subs that do not match file name perfectly.
sub-auto=fuzzy
Default subtitle font when none are specified.
sub-font='Trebuchet MS'
sub-bold=yes # Set the font to bold.
#sub-font-size=55 # Set default subtitle size if not specified.
Advanced Video Scaling Config
Internal Scalers
Note: Press shift + I in mpv to view frame drops. Then press 2 to view frame times and processing layers. Make sure your config does not drop frames and ideally frame times should be <25ms.
scale is the luma upscale method. Prioritize resource on this over cscale.
dscale luma downscale method.
cscale chroma upscale method. Human eyes aren’t as sensitive to chroma compared to luma.
If you enabled profile=gpu-hq earlier, these are the options set by it (no need to include these lines again):
#Scaling algorithm set by profile=gpu-hq
scale=spline36
dscale=mitchell
cscale=spline36
Default gpu-hq should be sufficient for most people, however, here are some suggestions for fine tuning:
I have a Toaster (crappy PC) edition:
scale=bilinear # Set spline16 if possible.
dscale=mitchell
cscale=bilinear
I have an iGPU laptop edition:
scale=spline36
dscale=mitchell
cscale=mitchell
I have a decent GPU (GTX 1050+) edition:
scale=ewa_lanczossharp
dscale=mitchell
cscale=spline36 # alternatively ewa_lanczossoft depending on preference
External Shaders
For those who have really good GPUs (GTX 1060+, sometimes need even better GPU) and want to run external shaders:
Remember to download the shader files and put them in the mpv config folder! ~~/xxx.glsl refers to xxx.glsl file in the mpv config directory.
Always enable profile=gpu-hq before using shaders for fallback at the beginning of the file.
DO NOT COMBINE shaders of the same type mindlessly. Just choose one. You’ll bork the image if you run multiple filters, they’re not designed to work together.
Dynamic Scaler: SSSR
SSSR is a dynamic scaler that improves built-in scalers utilizing structure similarity. Upscale result varies widely depending on your scaler. You may freely choose your preferred one. Moderate to highly GPU intensive. This is my personal favorite due to its versatility.
For a sharper image:
glsl-shader="~~/SSimSuperRes.glsl" # Set B C parameter to Robidoux.
scale=ewa_lanczossharp
dscale=mitchell
cscale=spline64
Alternatively set to haasnsoft for a softer look (much better at artifact/aliasing supression). I found this combo to be very good for anime and performs close to NN based upscalers.
glsl-shader="~~/SSimSuperRes.glsl" # Set B C parameter to Mitchell.
scale=haasnsoft
dscale=mitchell
cscale=ewa_lanczossoft
If you really want to run SSSR on a lower-end GPU, the full power version of MX150 (1D10 25W) should be able to run it if you use the faster algorithms. Results will still be better than spline36. Use bilinear/spline16/spline36 (whichever your GPU can handle without dropping frames) for a sharper image. For anime, if you want a softer anti-aliasing look like haasnsoft, use bicubic.
glsl-shader="~~/SSimSuperRes.glsl" # Set B C parameter to Robidoux for sharper image, else use Mitchell (slightl sharper) or Catrom (default).
scale=bicubic # or bilinear or spline16/36
dscale=mitchell
cscale=mitchell
You can modify the SSSR shader’s cubic B and C parameters (on line 31 and 79) to your needs. Default is Catrom (0,1/2). Set to Mitchell (1/3,1/3) or even Robidoux (0.3782,0.3109) for a sharper image. See this graph.
2x Pre-Scaler: Neural Network Scalers
Some of these shaders require high-end GPUs to run smoothly. 2x pre-scaler means they scale a fixed 2x and should only be used if you have a 4K monitor (1080p x2 = 4K). For NN upscalers, more neurons = better quality but significantly more computational power.
Always remember to set profile=gpu-hq first (at beginning of file).
profile=gpu-hq
Choose 1 of the 2x pre-scalers:
- FSRCNNX is very good for general use / real-life content, may amplify artifacts (due to it being true to its source). Requires good source material. MadVR equivalent would be NGU-Sharp. Very GPU intensive.
glsl-shader="~~/FSRCNNX_x2_8-0-4-1.glsl"
- RAVU Lite is relatively lightweight and decent for anime due to the lite version being sharper. I would use SSSR over this due to SSSR being better imo. Moderately GPU intensive.
glsl-shader="~~/ravu-lite-r4.hook"
- NNEDI3 is designed for anime use. Result is very close to MadVR’s NGU-AA. Very GPU intensive.
glsl-shader="~~/nnedi3-nns32-win8x6.hook"
Remaining:
dscale=mitchell
cscale=spline64 # or ewa_lanczossoft (or your choice, really)
Dynamic Scaler for Anime: Anime4K
Do NOT mix Anime4K with other shaders/scalers.
Anime4K is a unique upscaler + shader designed for Anime. It used to be very destructive, sharpens lines for a… unique “visual quality” look. It works extremely well in some anime and eh in others. Definitely isn’t for everyone. Version 0.9 had lots of flaws (mainly texture banding and line bloating). 1.0RC fixes a lot of the flaws (mainly bad banding) at the cost of doubling GPU consumption. 1.0RC2 optimized GPU usage (even more effecient than 0.9, 1080p > 4K should just barely run on a GTX 1030) and also introduced 2 more speed profiles for even weaker systems (supposedly the fastest profile can run on iGPUs at the cost of shader quality).
The latest 1.0RC2 tones down the “filtered look” even more and serves as an upscaler + filter of {line thinning + line smoothening + sharpening} + artifact/texture-denoiser (reduces jpeg-like edges) combo (note: filter only active when upscaling). One down side to Anime4K compared to other upscalers is that due to line thinning, anime with bad aliasing effects looks even worse (stares at badly made isekai anime magic circles).
Latest Anime4K have multiple glsl files that can be mixed and matched. See documentation for how to set it up for mpv.
# See Anime4K documentation, setup has changed a lot since the 1.0 days.
# Following is an example for v3.1 setup for 1080p scaling + post-processing
glsl-shaders="~~/shaders/Anime4K_Denoise_Bilateral_Mode.glsl;~~/shaders/Anime4K_DarkLines_HQ.glsl;~~/shaders/Anime4K_ThinLines_HQ.glsl;~~/shaders/Anime4K_Upscale_CNN_M_x2_Deblur.glsl"
For those interested in higher quality downscale:
SSIM downscaler is tuned to be used with mitchell. However, you shouldn’t be downscaling in the first place so just having dscale=mitchell fallback should be good enough.
glsl-shader="~~/SSimDownscaler.glsl"
dscale=mitchell
linear-downscaling=no
For those inteested in higher quality chroma upscale:
Imo cscale=spline36 is already very good. Human eyes aren’t that sensitive to Chroma compared to Luma. I won’t be surprised if you can’t even tell the difference when simply using cscale=mitchell. However, if you just want the best of the best and have the extra processing power, KrigBilateral is a high quality Chroma upscaler.
glsl-shader="~~/KrigBilateral.glsl"
I always advise testing out settings yourself, “quality” is extremely subjective. For example, in anime, destructive filters (denoise/de-ring/sharpen) upscalers may “look better” visually but not necessarily be true to its source (lower SSIM/PSNR).
If we go purely by measurement, haasnsoft should be a terrible upscaler (and it kinda is with normal content). However, when paired properly with SSSR it looks great in anime. Similarly, NNEDI3 looks better with Anime (as it’s trained for such) despite FSRCNNX is the technically better (accurate) upscaler.
Anime “visual quality” greatly favors algorithms that de-aliases, denoises and sharpens lines to be defined. This is why Anime4K is such a controversial upscaler as it takes these concepts to an extreme.
In terms of algorithm quality (Note: better quality usually = more GPU usage):
abc = abc built-in shader
[xyz] = xyz external shader (requires downloading glsl/hook files)

For scale:
[NNEDI3] or [FRCNNX] > [SSimSuperRes + haasnsoft/ewa_lanczossharp] > ewa_lanczossharp > spline36 > spline16 > bilinear
                <------------------------[Anime4K] (personal preference)------------------------->

For dscale:
[SSimDownscaler] > Mitchell

For cscale:
[KrigBilateral] > spline64 / ewa_lanczossoft / spline36 > mitchell
Upscalers Demo:
Open in new tab to view full size.
2x upscale from 100×54 to 200×108 image (Source: DanMachi).
NNS = nearest neighbor (also interger upscale in this case, essentially original image). mpv default is bilinear. Anime4K shown is older 1.0RC ver.

Personal mpv.conf file
Note: I’ve since upgraded my system, current sample file is tailored towards a mid-end desktop with a DCI-P3 monitor intended to be used with SVP. Please modify the file to your needs and not blindly copy-paste.
###--- Enable this section only if you use SVP 4, requires Vapoursynth mpv build ---###
#input-ipc-server=/tmp/mpvsocket # *nix only
input-ipc-server=mpvpipe # Windows only
hwdec=auto-copy
hwdec-codecs=all
hr-seek-framedrop=no
no-resume-playback
###--- End of SVP Section ---###

profile=gpu-hq

#gpu-api=vulkan #Default is now updated to use D3D11 which works better with my current setup.

target-prim=dci-p3 # Clamp video color to display correctly on my DCI-P3 monitor.

# UI/Behavior setup.
alang = 'jpn,jp,eng,en'
slang = 'eng,en,enUS'
keep-open=always
reset-on-next-file=pause
window-scale=1
autofit-larger=75% #Set Resolution (HorizontalxVertical or Screen%, i.e. 1280x720 or 50%)
autofit-smaller=858x480
no-osd-bar
osd-duration=500
osd-font='Trebuchet MS'
#osd-font-size=24

#osc=no # Hide OSC. Use this option ONLY if you have a custom osc.lua

# Configure network/youtube-dl options:
ytdl-format=bestvideo[height<=?1080]+bestaudio/best # Set max streaming quality as 1080p.
demuxer-max-bytes=150000000 # Max pre-load for network streams (1 MiB = 1048576 Bytes).
demuxer-max-back-bytes=75000000 # Max loaded video kept after playback.
force-seekable=yes

# Screenshot:
screenshot-format=png
screenshot-high-bit-depth=yes
screenshot-png-compression=3 # Setting too high may lag the PC.
screenshot-directory="%USERPROFILE%\Pictures\mpv"

# Deband filter. Always turn on for anime.
deband=yes # Default values are 1:64:16:48

# Deband parameters configuration.
deband-iterations=2 # Range 1-16.
deband-threshold=35 # Range 0-4096.
deband-range=20 # Range 1-64.
deband-grain=5 # Range 0-4096.

dither-depth=auto

volume=100
volume-max=100

demuxer-mkv-subtitle-preroll=yes
sub-auto=fuzzy


glsl-shader="~~/shader/SSimSuperResMitchell.glsl"
scale=ewa_lanczossharp
glsl-shader="~~/shaders/KrigBilateral.glsl" # High quality chroma upscaler.
input.conf Config
You may create an input.conf in the same directory as mpvconf to override default shortcuts. Here is a cheatsheet for the default shortcuts:
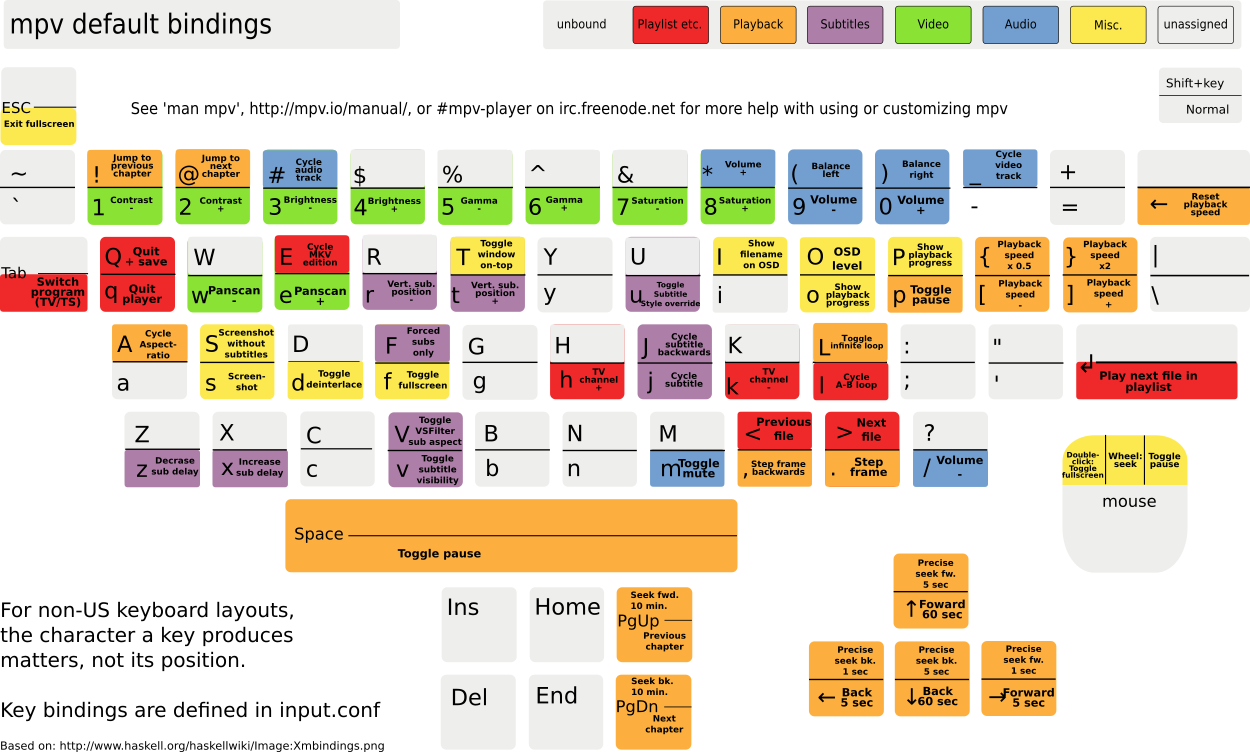
Keep in mind depending on your country keyboard, you may need to modify the file accordingly. For example, the key = has been ‘incorrectly’ mapped as + for default shortcuts (e.g. alt + = for zoom is mapped as alt + + which won’t work on the US keyboard). This is because in some countries the = key is the + key, and while on the US keyboard they are the same key the + is actually shift + =.
Basically when mapping, a means pressing a, but A means shift + a.
To fix the incorrect zoom shortcut:
Alt+- add video-zoom -0.1
Alt+= add video-zoom 0.1
To modify skip durations and add custom skip shortcuts:
Note that keyframe seeking is much faster (no render lag) but may not be exactly x seconds.
# Seek 5s exact, do not display OSD.
RIGHT no-osd seek  5 exact
LEFT  no-osd seek  -5 exact
# Seek 5s to the closest keyframe.
Ctrl+RIGHT  seek  5
Ctrl+LEFT   seek -5
# Seek 20s exact.
alt+RIGHT no-osd seek 20 exact
alt+LEFT no-osd seek -20 exact
Modify mouse wheel to control volume:
WHEEL_UP add volume 10 # In volume %.
WHEEL_DOWN add volume -10
Add audio delay hotkey:
ctrl+= add audio-delay 0.1 # In seconds.
ctrl+- add audio-delay -0.1
Add subtitle delay:
. add sub-delay +0.042 # 0.042s is 1 frame for a 24fps video
, add sub-delay -0.042
I came from MPC-HC so I remapped many shortcuts to the same keys.
Add full-screen shortcut like that in MPC-HC:
F11 cycle fullscreen
Add screenshot shortcut like that in MPC-HC:
F5 screenshot video # Video stream screenshot (extract video frame).
shift+F5 screenshot # File stream screenshot (video frame + render subtitles/signs)
ctrl+F5 screenshot window # Window screenshot (screenshot current player frame including OSD, shaders, upscale, etc.)
Cycle subtitle & audio like in MPC-HC:
s cycle sub
S cycle sub down # shift + s cycle backwards
a cycle audio
Cycle ASS subs style override:
u cycle-values sub-ass-override "yes" "force" "strip" "no"
ctrl+, add sub-scale -0.05 # Decrease sub size by 5%
ctrl+. add sub-scale 0.05 # Increase sub size by 5%
Cycle adaptive sharpen shader:
Note: Requires AdapSharp glsl in mpv conf directory. When AdapSharp is active sigmoid-upscaling needs to be no.
g change-list glsl-shaders toggle "~~/adaptive-sharpen.glsl"; cycle-values sigmoid-upscaling "no" "yes"; show-text "glsl-shaders='${glsl-shaders}'\nsigmoid-upscaling=${sigmoid-upscaling}"
Cycle deband on/off and weak/medium/strong:
Note: the ‘weak’ first set of deband values here needs to match the values set in mpv.conf or the value order will be messed up (in this specific case 2:35:20:5).
h cycle-values deband "yes" "no"
H cycle-values deband-iterations "2" "3" "4" ; cycle-values deband-threshold "35" "45" "60" ; cycle-values deband-range "20" "25" "30" ; cycle-values deband-grain "5" "15" "30" ; show-text "Deband: ${deband-iterations}:${deband-threshold}:${deband-range}:${deband-grain}" 1000
Visit the wiki or the default input.conf for more info.
mpv Custom Build
Here is a custom built mpv with Vapoursynth enabled (for Windows). Also includes a custom built FFmpeg in the folder. The folder is portable, and the settings are also in the portable folder. The OSC is also custom, delete osc lua and conf files if you want the default back.
Note: \portable_config\ folder takes priority over %APPDATA%\mpv folder. (i.e. \portable_config\mpv.conf will load instead of ~~\mpv.conf.)
Download the 7z or zip archive.
UPDATE: Newer mpv build 7z archive, includes newest Anime4K stuff. HOWEVER, the newer builds post v29 have an OSC bug where it fails to load my custom OSC half the time. If this annoys you, delete ~~\scripts\osc.lua and \script-opts\osc.conf and just use the default UI. I also included the older mpv.exe renamed as mpv.exe.old if you want the older stable executable back, though the newer version should offer better compatability with newer formats such as AV1 and HDR stuff. Important EDIT: Adding osc=no in the config file completely fixes this issue by forcing the original osc to be disabled, thus successfully loading the custom osc.lua. This line is not present in the current provided download so you will need to add it yourself.
Update 2: mpv build. Same as last update but with updated binary/ytdl from shinchiro and no-osc fix.
Update 3: The builds by shinchiro in the official mpv downloads now include Vapoursynth, you can just update the above mpv by overwriting the binary with his builds. As for youtube/web support, the new fork yt-dlp on Github is where it’s at now. You can download it and place the exe in the same directory as mpv.exe, and add script-opts=ytdl_hook-ytdl_path="yt-dlp.exe" in mpv.conf to manually point to it.

Thank you so much for this post
LikeLike
Hey, I downloaded your MPV custom build but i don’t understand everything is laggy when playing a video down to 23FPS and its really bad every frame is slow down
Any way to fix this ?
RTX 2080 Super
3800X Ryzen
144hz 2560×1440 Monitor
LikeLike
If you didn’t modify any settings, it might be a driver problem. Try setting the `gpu-api=vulkan` to `opengl` or `D3D11`. If you messed with the settings, you might have conflict depending on what you midified.
LikeLike
Could you add DXVA Checker then explain it in your blog?
it helps another user for determining the right hardware acceleration than put random configuration
https://bluesky-soft.com/en/DXVAChecker.html
LikeLike
It’s irrelevant. I didn’t go through it in my post, but DXVA usage is controlled by hwdec, which is set to auto by default. If DXVA is not supported (a.k.a. you have a system older than Windows XP), it will fallback to software decoding.
LikeLike
just play files from the portable mpv, without any edits or preinstall of any sort?
LikeLike
You might need to edit the config to fit your system, such as windows size resolution limits and upscaling algorithms.
LikeLike
is plex any good for watching anime, or should i watch it in a local player instead
LikeLike
Nothing wrong with Plex. Sometimes convenience is more important than video quality.
LikeLike
Thanx for the custom build. Do you update this custom build with new versions of MPV when they come out? Is it currently on latest build on MPV?
LikeLike
No, the newest build breaks my custom UI due to me hacking it together from an existing .osc. You can always compile a custom build yourself using media-autobuild on github.
LikeLike
What do you think about mpv.net?
LikeLike
As long as it runs on mpv backend, they’re the same in my book.
LikeLike
How can I make the forward and back button usable for next/previous file if there are no chapters? It’s useless in it’s current form.
LikeLike
https://github.com/mpv-player/mpv/issues/4738#issuecomment-321298846
LikeLike
Thanks for this, though for some reason this build won’t display subtitle shapes, like obscuring boxes to cover up a sign to put english on it.
Example here : https://mega.nz/file/O3JUVLiK#mR2VkqEXwZXatt-82RFheu3HgzzNIHvib_PfcscEIvY
At the bottom, the original japanese is supposed to be erased with a black box, the english didn’t fit very well so we did that and just re-wrote the japanese in too, but smaller.
I don’t know if there’s any settings that could be tweaked to fix this, or if it’s just because it’s based on an older build of MPV?
I tried your version because I was getting super-annoyed trying to config vanilla MPV.
LikeLike
Not sure. Make sure you don’t have style-stripping enabled. Sorry I couldn’t be much help.
LikeLike
use daum Pot player you can override soft subtitle font style by yourself
LikeLike
So, I want to try to change the UP and DOWN arrow key from seek +/- 60, to add volume +/- 2…
how?
LikeLike
The default commands: https://github.com/mpv-player/mpv/blob/master/etc/input.conf .
Remember to remove the “#” in your own input.conf, as the “#” marks the line as a comment (a.k.a. inactive code). Play and swap the commands around.
LikeLiked by 1 person
edit file “input.conf” open with notepad or notepad++ run as administrator, save as all files and encoding set UTF-8 with BOM
# Mouse wheels, touchpad or other input devices that have axes
# if the input devices supports precise scrolling it will also scale the
# numeric value accordingly
WHEEL_UP add volume 2 # default “seek 10”
WHEEL_DOWN add volume -2 # default “seek -10”
#WHEEL_LEFT add volume -2
#WHEEL_RIGHT add volume 2
## Seek units are in seconds, but note that these are limited by keyframes
RIGHT seek 10 # default “seek 5”
LEFT seek -10 # default “seek -5”
UP add volume 5 # default UP seek 60
DOWN add volume -5 # default DOWN seek -60
LikeLike
NNEDI3 is inferior to FSRCNNX is every measurable metric. They are not equal. It would be more appropriate to recommend FSRCNNX/ RAVU/ NGU instead of NNEDI3/Anime 4k.
https://artoriuz.github.io/blog/mpv_upscaling.html
LikeLike
Inferior is very subjective. For example, psyco-visual optimizations hurt video quality metrics (even VMAF) in h265, but almost all encoders/groups use it as it improves visual quality to the human eye.
As I mentioned in the post:
> I always advise testing out settings yourself, “quality” is extremely subjective. For example, in anime, destructive filters (denoise/de-ring/sharpen) upscalers may “look better” visually but not necessarily be true to its source (lower SSIM/PSNR).
> If we go purely by measurement, haasnsoft should be a terrible upscaler (and it kinda is with normal content). However, when paired properly with SSSR it looks great in anime. Similarly, NNEDI3 looks better with Anime (as it’s trained for such) despite FSRCNNX is the technically better (accurate) upscaler.
> Anime “visual quality” greatly favors algorithms that de-aliases, denoises and sharpens lines to be defined. This is why Anime4K is such a controversial upscaler as it takes these concepts to an extreme.
LikeLiked by 1 person
Hi, thank you for the excellent and comprehensive writeup!
After reading your and “iamscum” blog posts, I’ve made this file but I am unsure of a few things here. Could you please check this?
https://pastebin.com/1xKhNZM8
LikeLiked by 1 person
I would slowly add settings and test them out. While your config file is “fine”, it seems that you just added a bunch of things without fully testing things. Some notes:
– Deband might be too strong to begin with. See my recommendations. Also, strong debanding requires deband-grain to work well.
– EWA filters aren’t affected by anti-ring if you plan to use it, although you’re currently using Anime4K
– Make sure you actually enjoy the current settings. And make sure Anime4K interacts well with your grain injection (I have my doubts they work well together).
– I probably won’t use built-in interpolation. IMO either disable it, or go with SVP 4.
– Lots of options you added could honestly be omitted unless you really need them.
– I would try hooking external shaders/filters one by one and testing if you really like them.
– Again, make sure you actually enjoy Anime4K. I recommend trying out SSIMsuperres too.
– You’re running a lot of stuff. Make sure your GPU is powerful enough and not dropping frames.
– The manual (https://mpv.io/manual/master/) is honestly the best place to see what option does what.
LikeLike
I downloaded your version of MPV and have some questions about the config file, in particular the scaler settings.
I noticed in your config file, you have all the settings there but then say “enable the section that matches your system/preference”. How do I “enable” the setting? Do I do this by deleting the other settings?
Thanks
LikeLike
Read the beginning of the article “To illustrate how the config file works:”.
LikeLike
https://github.com/dragons4life/MPC-HC-config-for-MPV/blob/master/input.conf
mpc hc input config for mpv
LikeLike
Do you have an MPV confg for non-anime show? I would be interesting in seeing what options you choose
LikeLike
Similar, though you wanna bias towards a lighter deband and sharper, non-destructive filters.
LikeLike
if you compress the mpv custom build with arc with peazip you’ll get the filesize down to 93.2 MB
LikeLike
Could I get your opinion on my config? I have it set up but I’m not sure if it will work well.
https://github.com/isaura-ux/mpv-config/blob/71ddf65d23cfa0f799aeef23c3474274b6a538e7/mpv.conf
Thanks!
LikeLike
Should be fine. While it’s likely to not affect it at all, you should set your fallback scaling options before you load the scripts. I think it doesn’t matter though.
LikeLike
I’m brand new to this so sorry if this is a dumb question. How do I use this with something like mpvnet? I tried editing the config then taking all the files and putting them in the same folder as mpvnet but subtitles now have weird grey block on them and a lot of the keyboard commands don’t work.
Thank you!
LikeLike
You will need to figure out it’s loading priorities, I’m not sure what difference mpvnet has. You might have 2 different configs conflicting.
LikeLike
Hi, I tried out your build and am using anime 4k shaders. Youtube and downloaded anime works fine but I cant seem to get crunchyroll or funimation videos to play in mpv. The app just closes after a bit. Can you help me please?
LikeLike
You will need to consult YouTube-dl commands and open mpv via command line. Crunchyroll has been updated to have an anti-ddos thingy so you need a cookie bypass I believe.
LikeLike
How do you setup and switch between playlists using MPV? Also should you run internal scalers and Anime4k or can it only be Anime4k? I get that you can’t use external shaders and Anime4k but I wasn’t sure if that extended to internal scalers
LikeLike
Uh not sure, I don’t use playlists. If you’re running any external shader typically just enable profile=gpu-hq at the beginning for fallback.
LikeLike
Thank you very much for your build, saved me quite some time with the settings and stuff. Do you plan on updating it to the latest ver?
LikeLike
Shinchiro’s builds now include vapoursynth so you can just download the latest build and replace the binary. There *shouldn’t* be any problems unless a huge update has happened.
LikeLike
Got it, what about anime4k? Looks like they added 7 new files to their release, do they matter?
LikeLike
Just follow their instructions on how to use it if you update it. They’ve changed many times from way back when they only have 1 file to multiple configurable filters.
LikeLike
Thanks again, successfully updated both mpv and anime4k, you rock!
LikeLike
What are all those extra .pyd and .dll files for?
LikeLike
SVP 4 and vapoursynth dependencies probably.
LikeLike
What’s python for?
LikeLike
I think vapoursynth is based on Python.
LikeLike
I’m using mpv.net as front end and followed yours and some other guides to narrow down my mpv.conf. I have keyboard short cuts (none of the keys except some mouse actions like closing player) not working. I have narrowed down the issue to ”gpu-api=vulkan’ – when this enabled no keys working but ok with ‘gpu-api=opengl OR gpu-api=d3d11 its all working fine. My GPU is 980ti. But video plays fine – I can’t check the statistics as keys not working. Is it because gpu is old or not supported for vulkan?
LikeLike
Possibly a driver issue, though 980 is new enough to use Vulkan. It’s could also be how mpv.net is compiled. No real way to know. D3D11 is the default these days so just use that if you don’t have compatibility problems with specialized scripts.
LikeLike
How do you change the B C parameter with SSSR shader, I don’t think there is anything to change at line line 31 and 79
LikeLike
I believe it’s 29 and 72 now.
LikeLike
Thanks, I tried changing it to mitchell, but I’m not sure if I did it right?
#define Kernel(x) MN(1/3, 1/3, abs(x))
LikeLike
Default of newer version seems to be Mitchell already, you can just use it directly.
LikeLike
Thanks for the guide. Could you please update the latest mpv build with configs you’re using rn for future reference?
LikeLike
Just replace the binary with shinchiro’s build. Last I checked he now compiles with vapoursynth.
LikeLike
Can you please tell me if this is the right scaler combination?
glsl-shader=”~~/shader/SSimSuperResMitchell.glsl”
scale=ewa_lanczossharp
dscale=mitchell
cscale=spline64
glsl-shader=”~~/KrigBilateral.glsl”
LikeLike
Seems fine. I’d prolly load the glsl files after setting the scalers, not sure if they can be loaded before declaring the scalers.
LikeLike
Hello, could you upload your osc.lua if you made any changed since the last mpv build you posted here? Thank you very much!
LikeLike
No changes.
LikeLike
Gotcha, is it possible to implement this in your OSC? https://github.com/po5/thumbfast
It would be the perfect combo in my opinion
LikeLike
Unfortunately this is out of my coding abilities, not do I currently have time to dedicate to hobbies anymore. What I suggest is that you could compare their osc.lua to the vanilla file and figure out how they implemented it, and if it only requires small modifications try to implement in mine.
LikeLike
Could you provide link download for “SSimSuperResMitchell”?
Unable to find it.
LikeLike
You can just use the regular SSIMSuperRes by igv on GitHub, the default BC values should be Mitchell last I checked.
LikeLike
Wow, your osc is nice and clean, could you provide a guide on how to edit it from original like that? I want to use latest osc from mpv source to make it look like yours!
LikeLike
To be frank it was kinda jury rigged from an old version, took days of testing to get the elements placed right. Some other 3rd party mpv builds have unique osc and I just copied code of elements I liked. Unfortunately how to edit the lua code isn’t well documented so even I can’t figure out how to properly make one from scratch.
LikeLike
Understandable. I hope it will work with new mpv updates that well as it does now. If you per chance did some changes/updates could you upload the latest version?
LikeLike