External Links
- Yuki Subs Guides has a master list of guides of all you need to know about anime encoding.
- Also, go visit my MPC-HC + MadVR, mpv, and SVP 4 setup guide!
Table of Contents
- x265 Settings Guide
- TL;DR Summary for x265 Encode Settings
- Audio Codecs Guide
- Conclusion
- Bonus: Ranting on Audio Gear and Recommendations
x265 Settings Guide
All my encoding parameters are tuned for Anime at 1080p. TL;DR at the end.
Why x265?
x265 is a library for encoding video into High Efficiency Video Coding (HEVC / H.265) video compression format. While developed as a replacement for H.264, due to early performance and licensing issues, it didn’t gain much traction, especially as a streaming format. While most devices now support HEVC in some form or another, adoption didn’t really kick off. Despite these downfalls, HEVC does compress much better in higher crf (lower bitrate) and has been a good codec to use since 2018. Most modern devices support hardware decoding (iOS, Android, laptops, Macs, etc.), and even at 1080p most older consumer PCs should be able to software decode just fine.
In terms of efficiency as of right now (2019/2020), when properly encoded, HEVC could save ~25% bandwidth minimum compared to AVC (H.264, with its encoder known as x264) from my observations. HEVC is about the same quality as VP9, a codec by Google. HEVC does have a slight advantage in terms of parallel encoding efficiency, though they are both just as slow when encoding compared to x264. VP9 today is mainly used by Google (YouTube) via the webm/DASH format, which Apple refuses to support on iOS devices which is probably why it’s not widespread. Update: Apple now somewhat supports VP9 on some devices for 4K streaming (iOS 14+).
What I’m more excited about is AV1. AV1 is a next gen codec with members from many tech giants (Apple, Google, MS, etc.) to create a royalty free codec. IIRC some of its baseline is based on VP10, which Google scrapped and had its codebase donated to develop AV1. Unfortunately the reference encoder libaom is still in early stages of development and is rather inefficient. SVT-AV1 is Intel and Netflix’s scalable implementation. It performs (quality-wise) not as well as libaom, but quality is still better than x265 (SSIM), and encode times are much more reasonable. For now, they look promising, and I am excited to see results in a few years. HEVC took 3-4 years before it was more widely accepted by Anime encoders, and took 5 years until 2018 before I began experimenting with it. AV1 began major development in mid-2018 so by that logic we got 2-3 more years to go.
What tools do I use?
Handbrake is a great tool for beginners. It allows reading Blu-ray disks (unencrypted), and has a pretty UI to deal with. While it runs on an 8-bit pipeline, this isn’t an issue for Anime. Hopefully 10-bit pipeline will be supported once HDR becomes common. (Update: 1.4.0 is still under development but should be updated to use a proper 10-bit pipeline for HDR.) If you want FDK-AAC, you will need a custom compiled version. Guides on how to do this are easily found.
Other useful stuff for dealing with Anime (research them yourself):
- MKVToolNix (MKV merge & Extract)
- FFmpeg
- jmkvpropedit
- Notepad++ or similar text editor
- Sushi
- Batch scripting (.bat files)
Which x265 encoder? 8-bit, 10-bit or 12-bit?
To keep things short and not get into technical details: use the 10-bit encoder (Main 10 profile).
10-bit produces slightly smaller files while preventing banding from 8-bit compressions (this isn’t a joke, quantization and linear algebra is a mysterious thing).
Why not just use 12-bit then you say? Well, to put simply: moving form 8 to 10 bit increases color gradient available from 256 to 1024 to eliminate banding, but going to 4048 in 12-bit really isn’t noticeable. In fact, it is much less supported, and from my tests back in 2018 the 12-bit encoder is actually worse than the 10-bit encoder at high crf likely due to less resources put into developing it.
What preset should I use?
First, one must understand x265 is fundamentally different than x264. In x265, the slower the preset, the bigger the file size is at the same crf. While counter intuitive at first, this is due to the more complex algorithms used to more precisely estimate motion and preserve details. To put into perspective how important presets are in x265, a clip encoded at crf=16 preset=medium is actually worse in quality than crf=18 with preset=slow, while also being 50% larger in file size. One may argue SSIM isn’t the best representation as a quality metric, but the matter of fact is that it’s an objective measurement readily available. Subjective tests I’ve done (using Kimi no Na Wa & NGNL Zero) also agree with the above statement. The move from fast to medium to slow each reduces bad noise and artifacts, though I do have to admit going any slower I could not observe any significant improvements (x265 3.1 has a revised veryslow preset that changes this).
Now to answer the questions which preset to use. In my mind, there are only 3 presets worth using: fast, slow, and veryslow.
fast preset, which the quality is pretty “eh”, is the first “sweet spot” from the list and does serve a purpose for people with really weak systems. It is barely any slower than the others while offering slightly better quality. However, it is rather lackluster in my opinion and should never used to encode anime, especially those with dark/complex scene.
slow is the second sweet spot as you could see from the graph below, and should be the preset most people should use. Yes, I know it isn’t the fastest at encoding videos (typically ~10fps for a modern 6-core desktop processor @1080p), but it does offer superior quality especially with fast moving objects in dark scene.
Normally I wouldn’t recommend veryslow. It does, however, have its place, especially with the recent changes in v3.1. The veryslow preset is very useful at higher crf values (22+), with much better motion estimation at low bitrates. The only downside to veryslow is its encoding speed, which is a gazillion times slower than slow and requires a supercomputer. At lower crf values you barely get any improvements and thus could be ignored.
Presets vs. SSIM at 4K (source):

Include 1% low & Encode time:

Presets vs. file bitrate at 4K

Bonus conversation: Due to x264 being much less complex, presets can pretty much maintain only a slight loss in quality as you encode faster. This gives an illusion that slower presets are slower due to spending more time compressing. The more correct way to see this is that slower presets are slower due to doing more motion calculations and finding the best scheme that best describes the frame, which in x264 just so happens benefits compression too. However, x265 is waaay more complex with motion algorithms, meaning that accurately describing motion actually increases bitrate.
x265 Encoding Efficiency
For mainstream systems, just let x265 handle it automatically. For more advanced encoders that may have beefier CPUs, or even servers, this section may interest you.
x265 heavily favors real cores over threads, so keep that in mind if you use programs like process lasso. Theoretically, a 1080p encode with a default CTU size of 64 has an encode parallelization cap of 1080/64 = 16.875 threads. Beyond that x265 will not scale linearly. You could lower CTU size to 32, but you lose some compression efficiency (~1-5% depending on source complexity, personal tests show ~1-2% for anime @crf=19), especially with anime where CTU of 64 actually does benefit.
For those interested, x265 heavily utilizes AVX2 instructions, which runs on 256-bit FPU for optimal speed. Keep this in mind when researching CPU choices.
The more threads you add into a pool, the more encode overhead you will experience, since every row of encode requires the upper right CTU block to complete before it can proceed. When the upper right block is more complex and slows down, the next row has to wait. More rows = more possibility of waiting to happen. This translates to about 30-50% efficiency when encoding with additional threads, with the value gradually lowering the more threads you have. Learn more about frame threading.
According to someone’s 128 core Azure VM test on a 4K footage w/ preset=veryslow, encode scales pretty much linearly to 32 cores, and a bit dodgy at 64 cores. If we translate this to 1080p in theory scaling should be good up to 16 cores, which agrees with our earlier theoretical calculation of 16.8 threads.
Earlier we determined the theoretical limit of 1080p is about 16 threads. While at first glance an 8 core CPU should be the limit, remember that x265 favors real cores over threads. This means on a 16 core CPU, each encoding thread gets a real core to run on, not to mention there are also other processes in the encode chain that could use the extra threads. Due to x265 encode threads being terrible at sharing a core you still get good efficiency. Realistically speaking, if you really want to peg your 16 core CPU at 100%, I would run 2 instances of 16 thread encodes (you gain maybe ~5-10% efficiency), or lower the CTU to 32 to increase the theoretical limit to 33 threads. You can control thread count with the --pools option.
Those with CPUs that have multiple NUMA domains, look at –pools options on how to set x265 to run on a single NUMA node, then run as many instances as NUMA nodes you have with each instance running on each NUMA.
If the link to x265 documentation is broken, manually search it up. The link changes all the time when they update x265.
Encoding Parameters
Now that we established we should always use preset=slow, let us look at parameters that you may want to use/override to improve quality. For test clips, I recommend NGNL Zero and Tensei Shitara Slime episode 1 as they represent pretty much the worse case scenario for encoding anime (lots of dark scene, fiery effects, glow effects, floating particles, etc.).
QP, crf and qcomp
Note: x265 also has ABR (average bitrate) and 2-pass ABR encoding mode which I won’t get into. As a quick summary: never use ABR, and only use 2-pass ABR if you absolutely must have a predictable output file size. 2-pass ABR will be identical to crf assuming the result file size are identical and no advanced modifications are made to crf (e.g. qcomp).
Before we begin, we need to understand the basics of how x265 works. QP, a.k.a. quantization parameter controls the quantization of each macroblock in a frame. In QP encoding mode (qp=<0..51>), QP is constant throughout, and each macroblock is quantized (compressed) the set QP target. I do NOT recommend using QP encoding mode, which I will explain why in a bit.
Keyword: Quantization – lossy compression achieved by compressing a range of values to a single value. Higher quantization (QP) = more compression.
crf (crf=<0..51>), known as constant rate factor, encodes the video to a set “visual” quality. Keyword: Visual. The major difference between crf and QP is that QP encoding mode has a CQP (constant quantization parameter) whereas crf uses the QP as a baseline, but varies QP based on perceived quality by human eyes. Essentially crf can more smartly distribute bitrate to where it visually matters as opposed to QP encoding mode where it quantizes (compresses) constantly (constantly in terms of math, not to the eyes). For example, crf will increase QP in motion scene due to motion masking imperfections, while decrease QP in static scene where our eyes are more sensitive. Additionally, in crf encoding mode, QP can be further manipulated with AQ and PSY options (discussed later).
The obvious downside to QP encoding mode, and especially crf is that it is almost impossible to determine the output size, particularly when modifying options that manipulate QP may result in drastic file size differences. However, as opposed to 2-pass ABR, crf guarantees that no matter which episodes you encode, they will all be at the same visual quality across.
One should always encode their own test clips and determine what crf they prefer and can accept in terms of size vs. quality loss. However, as a general guide (personal opinion):
- I have a small laptop / I watch on TV / 21″ monitor: crf=20-23
- I have a 24-27″ monitor: crf=18-21 (crf=18 is my lowest recommended value for Anime, note that going below crf=18 may increase file size quite rapidly.)
- I have a 4K 27″ monitor/TV in my face and I want minimal artifacts: crf=16-18
- I have a 4K 27″ monitor/TV in my face and I determine video quality by pausing the video and using a magnifying glass (lol): crf=14
Jokes aside, video quality should be assessed by watching, and not by pausing the video. If you can’t see the flaw without pausing the video, is it really a flaw after all? 4K requires higher crf due to upscaling often amplifying artifacts, and high quality upscalers (especially ones like FSRCNN) often benefit from higher quality source.
The variability of crf can be manipulated with qcomp (quantizer curve compression factor; qcomp=<0..1>), but I recommend leaving it alone at default qcomp=0.6. qcomp isn’t as important of a variable as it was in x264 (since x264’s aq-mode=2 & 3 are pretty much broken). In terms of crf encoding mode, high qcomp leads to more aggressive QP reduction (higher bitrate) for complex scene. aq settings also affect qcomp somewhat. crf in x265 is somewhat a pain to tune and confusing to beginners due to tons of settings being intertwined controlling bitrate and quantization.
However, if you are encoding a source where it is mainly either simple scene or complicated motion, you can try increasing qcomp. Somewhere around qcomp=0.8 should be sufficient for even the most extreme cases. One interesting strategy to use for such source is to increase crf by 1 and use qcomp=0.8. This results in similar file size, but complex motion scene essentially gets allocated more bitrate than static portions. Beware of doing this to “average anime” as combining this with other quantization options (AQ, psy) incorrectly may lead to bitrate starving normal scene.
Now before I get to other parameters, it is possible to tune a crf=20 video to be better than one at crf=18. Raising crf isn’t end-all-be-all solution to everything so make sure to read the following sections and do encode tests yourself.
bframes
Allowed values are <0..16>. For anime just use 8. 8 has minor savings (~3-5%) over default 4 with a small encode time penalty (~5%), 16 is pretty much only useful for static images (BD Menu), and the encode penalty isn’t worth the saved space (<1% smaller than 8).
For a crf=20 episode (~200-400MB/ep), expect about a few MB savings per anime episode going from 4 to 8. While at first glance it isn’t worth it, on the higher end (static-ish low-fps slice of life) you might be able to save 15-30 MB per episode (~5-10% savings on the very extreme end).
If you don’t want to use 8, 6 should be the sweet spot since around 5-6 is where consecutive b-frames drop to single digit percentages for most anime. If you must squeeze every performance possible, I recommend not going below 3.
You can also encode an episode with bframes=16 and look at the encode log to optimize for your content.
Example encode log with bframes=16, values represent consecutive b-frames percent from 0-16 (notice the sudden drop at 6 b-frames and another drop to decimals at ~8+ b-frames):
x265 [info]: consecutive B-frames: 18.8% 10.2% 19.2% 12.4% 8.3% 15.9% 4.7% 3.1% 2.9% 0.8% 1.2% 1.7% 0.3% 0.2% 0.1% 0.1% 0.2%
bframe=n % file size of bframe=0 (Rokudenashi ep1 crf=19/17):

ref
According to legend the more the better. Consensus is that optimally you should use ref=6 for 10-bit anime encodes. x265 allows values of <1..16>, although 8 is the the “true maximum” x265 can currently use and any more actually doesn’t improve quality.
A study from late 2018 showed that going from ref=1 > ref=5 > ref=10 > ref=16 improved quality by 0 > 0.04 > 0.13 > 0.13 PSNR @720p with 100% > 135% > 179% > 223% encode time penalty. Note that 10 to 16 changed nothing due to true max capped at 8. For reference, we measure the difference of presets at the 0.x magnitude for PSNR.
Optimally you should use ref=6, although I personally stick with the default preset=slow‘s ref=4. Note that ref=6 is the max you can go if you enabled b-frames and --b-pyramid. Newer versions of x265 also blocks non-conforming values.
Loop Filters: sao, limit-sao, no-sao and Deblock
SAO is the Sample Adaptive Offset loop filter. SAO tends to lose sharpness on tiny details, but improves visual quality by preventing artifacts from forming by smoothening/blending. I would leave this on for crf>=20 (sao). crf=18 it depends on personal taste and anime, most of the time I set it to limit-sao. I would not turn off sao (no-sao) with crf any higher than crf=16 unless you are trying to preserve extremely fine grain/detail.
deblock specifies deblocking strength offsets. I tend to leave it at default deblock=0:0 or deblock=1:1. If you want to preserve more grain/detail, you may set it to -1:-1. Please note in FFmpeg based programs you will need to type deblock=0,0 to pass the values, as : is a parameter separator.
Psycho-Visual Options: psy-rd and psy-rdoq
Traditionally, the encoder tends to favor blurred reconstructed blocks over blocks which have wrong motion. The human eye generally prefers the wrong motion over the blur. Psycho-visual options combat this. While technically less “correct”, which is why they are disabled for research purposes, they should be enabled for content intended for “human eyes”.
psy-rd will add an extra cost to reconstructed blocks which do not match the visual energy of the source block. In laymen’s terms, it throws in extra bits to blocks in a frame that are more complex. Higher strength = favor energy over blur & more aggressively ignore rate distortion. Too high will introduce visual artifacts and increase bitrate & quantization drastically.
psy-rdoq will adjust the distortion cost used in rate-distortion optimized quantization (RDO quant). Higher strength will also prevent psy-rd from blurring frames.
If you didn’t understand any of that, don’t worry. Basically, these 2 options are crucial to QP manipulation and grain/detail preservation. psy-rd will decide the tendency to add extra cost (bitrate) to match source visual energy (i.e. grain, etc.) and psy-rdoq will restrict blur favoring higher energy. Too low and details will be blurred to improve compression (the reason why people hated x265 in the early days), too high and you create artificial noise and artifacts. Note that psy-rdoq is less accurate than psy-rd, it is biasing towards energy in general while psy-rd biases towards the energy of the source image.
For anime, use psy-rd=1. On anime with some grain/snow/particles, or lots of detailed dark scene (often anime movies), set psy-rd=1.5 (e.g. Kimetsu no Yaiba). If grain is a main feature, or the whole series is dark, well mastered with details you may use psy-rd=2 (e.g. NGNL Zero has lots of fallout dust and complex details throughout the whole movie).
psy-rdoq is the key to preserve grain (and also quite aggressively lowers QP). Keep in mind the --tune grain x265 built-in actually has too high of a value for slower presets, as it actually artificially creates even more grain. For anime, I would leave it at default psy-rdoq=1. With some grain/CRT TV effects, I would set it to psy-rdoq=2 or 3 depending on how strong the effects are. For anime where grain effects are staple throughout, or to eliminate blocking in complex fast motion scene at lower crf (<16) you may increase the value to 4–5. Additionally, some anime use grain to prevent blocking/banding and may also need a higher value to prevent micro-banding. Note that these values apply to preset=slow. A higher value may be needed for faster presets.
Keep in mind both these options drastically increase file size, but also improve visual quality. On lower bitrate encodes, having too high of psy-rd may starve bitrate from flat blocks, and too high psy-rdoq may also create artifacts.
I recommend psy-rd=1 and psy-rdoq=1 for most of the anime out there. I sometimes use psy-rd=1.5 and rarely ever go to 2. I rarely use psy-rdoq >2 due to how much bitrate it increases, and due to it technically being less accurate has it induces noise from quantization decisions unlike rd which induces noise based on the source. (To me, its not worth increasing the value to make that 10 second grainy scene look better. I only increase it when the whole show/movie has grains/grain-like objects).
Read more about it on x265.readthedocs.io.
Note: Lowering pbratio and ipratio may also improve grain retention (more “real” frames over b/p frames), although I do not recommend touching them.
Adaptive Quantization Options: aq-mode and aq-strength
aq-mode sets the Adaptive Quantization operating mode. Raise or lower per-block quantization based on complexity analysis of the source image. The more complex the block, the more quantization is used. This offsets the tendency of the encoder to spend too many bits on complex areas and not enough in flat areas.
As this is beneficial for anime, you pretty much want this enabled. As for the modes:
- 0: disabled
- 1: AQ enabled
- 2: AQ enabled with auto-variance (default)
- 3: AQ enabled with auto-variance and bias to dark scenes. This is recommended for 8-bit encodes or low-bitrate 10-bit encodes, to prevent color banding/blocking.
- 4: AQ enabled with auto-variance and edge information.
I highly recommend, in fact I think it pretty much is a must to use aq-mode=3 for anime. It raises bitrate in dark scene to prevent banding. Seasoned encoders will know dark scene with colorful glowing effects (i.e. fire) and dark walls with subtle colors are most prone to banding, blocking, and color artifacts. Setting aq-mode=3 is so beneficial to anime that a crf=20 encode with it looks better than a crf=18 encode without while having similar file size.
aq-strength is the strength of the adaptive quantization offsets. Default is 1 (no offset). Higher = tendency to spend more bits on flatter areas, vice versa. Setting <1 in crf mode decreases overall file bitrate and reduce spending bitrate on plain areas (but potentially introduce blocking/banding in higher crf). For anime, anywhere from aq-strength=0.7 to aq-strength=1 is acceptable depending on the show. I tend to leave it at default unless I feel that aq-mode is spending too much bits. Setting this high sometimes helps with grain preservation, but very expensive bitrate wise and may cause halo artifacts.
aq-motion and hevc-aq are experimental features that are still broken but should be interesting to use in the future (unless AV1 beats it to the punch). From my tests hevc-aq lowers overall VMAF slightly but increases 1% low.
no-strong-intra-smoothing
Prevents bilinear interpolation of 32×32 blocks. Prevents blur but may introduce bad blocking at higher crf. I do not use this option on my encodes. For non-anime stuff, this option may help preserve small details from blurring such as hair. I recommend not using this option unless you have no-sao and low crf as sao has a bigger impact on blur.
no-rect
Disable analysis of rectangular motion partitions. rect is enabled for presets lower than slow. Enabling rect may help improve blocking in challenging scenes. For preset=slow, disabling saves ~25% encode time at the cost of 1-3% compress efficiency.
I recommend not touching rect as this is the main difference between preset medium and slow, unless you really want to save the encode time. Do note that your video quality will decrease ever so slightly.
constrained-intra
I advocate to always encode directly from the blu-ray disk as you avoid re-encoding. Re-encoding (or to be more technical: generation loss) is very destructive for video quality, even more so than re-encoding audio.
However, not everyone could afford blu-rays and rip them manually. If you are forced to re-encode (i.e. you got your video files from cough), ensure you have the highest quality encode possible and enable constrained-intra to prevent propagation of reference errors. For re-encodes I would not go below crf=20 as any lower simply isn’t worth it.
Keep in mind this isn’t a magic parameter to remove artifacting from re-encodes. Edges, especially edges close to each other (e.g. hair) tend to have jpeg-like artifacts in between. Dark scene also suffer (since they’re usually the most artifact prone in an anime encode). Any artifacts from the source will also likely be amplified.
Note: Very rarely, but happened once to me, constrained-intra might cause encoding errors that look similar to missing p-frame data.
frame-threads
Number of concurrently encoded frames. Set frame-threads=1 for theoretical best quality and ever so slightly better compression. If you have <=4 core CPU you may consider this option. High core count systems will suffer greatly (encode speed) if set to 1. I found really no quality loss setting it to >1. As for the “max” to set before losing quality, from my test setting it from 2 to 16 yielded identical results to each other contrary to claims that setting it >3 hurts quality. Basically just let your system handle this value unless you really want to encode with frame-threads=1.
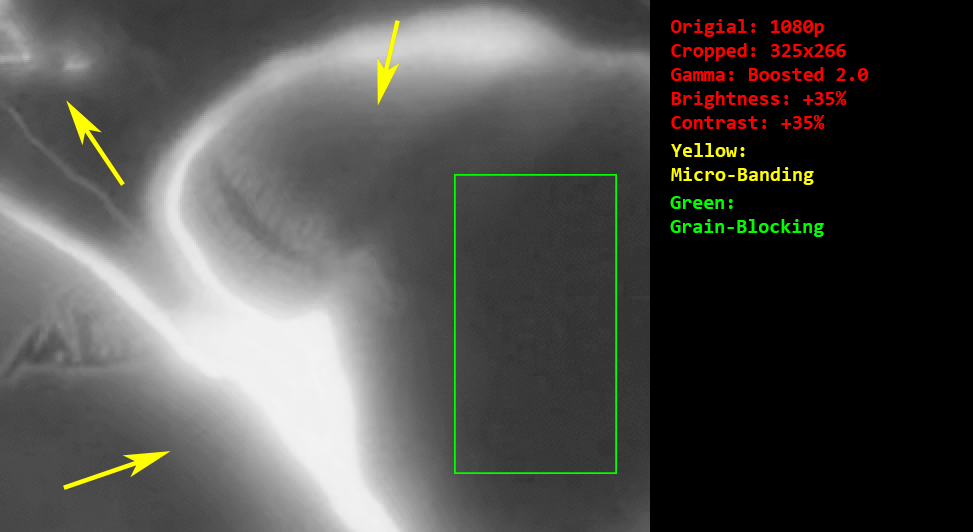
x265’s Biggest Flaw: Grain, Micro-Banding, and Grain-Blocking
As we discussed, x265 has a tendency to blur/smoothen to save bitrate. While this can be mitigated somewhat with psycho-visual options, encoders should be aware of what I call the “Miro-Banding” and “Grain-Blocking” phenomenon. As we know, banding in x265 mostly occurs in dark scene. To combat this, many studios are starting to inject dynamic grain to prevent this in AVC 8-bit BD encodes (Increasingly prevalent post 2018/2019). While extremely effective due to BD’s having very high bitrates, this is actually detrimental to higher crf x265 encodes. On a smoky/fiery grainy scene, x265 tends to smoothen out each block creating weird “patches” of regional grainy block (I call this “grain-blocking”, though do note it isn’t “blocking” per se and more of “regional encode-block” color difference that still has a smooth gradient across). For example, the intro scene in ep1 of Tensei Slime exhibits this problem with smoke and fire effects.
x265 also introduces micro-banding when smoothening out the bright objects in the dark with glow effects, and is even more noticeable (slightly wider) when the source has dynamic grain. These micro-bands aren’t conventional banding, but extremely thin bands that only appear in dark scene objects with strong color gradient change (e.g. edges of fire where color rapidly changes from white to red to yellow glowing then to dark grey in a short distance, or a glowing katana swinging sword effect). Micro-banding are a bigger pain as even stronger deband filters cannot smoothen it out during post-processing (i.e. when watching), and unlike grain-blocking where tuning psy values can easily fix it, micro-banding requires a much lower crf value on top of that to suppress. Luckily, micro-banding is much more rare in encodes and that few seconds in a movie is unlikely to harm viewing experience.
There is no simple answer to fix these 2 problems due to crf targets. Traditionally in x264 such scene will simply end up in blocking artifacts. x265 chooses to eliminate artifacts at the cost of detail loss. The down side is that even at lower crf targets it is tough to eliminate x265’s tendency to blur. To truly eliminate such effects, you will first need no-sao:no-strong-intra-smoothing:deblock=-1,-1 to make x265 behave more like x264, then raise psy-rd and psy-rdoq accordingly (2 and 5 respectively should do the trick). However, this reintroduces unpleasant artifacts x265 aimed to eliminate in the first place, thus I do not recommend such encode parameters unless encoding crf <16 (in which case file sizes are so big just use x264, why even bother x265?).
Image set to greyscale, with color/gamma corrections to amplify the artifacts. Micro-banding is self-explanatory. For grain-blocking, you can see each block still retains the grains, but the average color for each block is different creating a “regional” grain-block effect.
Filtering
Unfortunetly I am not familiar with AVS and VPY scripting and cannot give advises on how to do it. However, x265 benefits greatly from filtering and can avoid its flaws with proper filters, such as proper denoise with masking and custom deband shaders tailored to different encodes. x265 also has a tendancy to magnify aliasing so AA scripts should benefit encodes too.
If you are serious about creating the best possible encodes, guide.encode.moe is a great read on filtering. You’d be amazed how good frames can look with proper descale, filter, and re-upscaling with superior algorithms.
TL;DR Summary for x265 Encode Settings
Set preset=slow. Then choose 1 following to override the default parameters. These are my recommended settings, feel free to tune them.
- 1 Setting to rule them all:
- crf=19,
limit-sao:bframes=8:psy-rd=1:aq-mode=3(higher bitrate) - crf=20-23,
bframes=8:psy-rd=1:aq-mode=3(more compression)
- crf=19,
- Flat, slow anime (slice of life, everything is well lit):
- crf=19-22,
bframes=8:psy-rd=1:aq-mode=3:aq-strength=0.8:deblock=1,1
- crf=19-22,
- Some dark scene, some battle scene (shonen, historical, etc.):
- crf=18-20 (motion + fancy & detailed FX),
limit-sao:bframes=8:psy-rd=1.5:psy-rdoq=2:aq-mode=3 - crf=19-22 (non-complex, motion only alternative),
bframes=8:psy-rd=1:psy-rdoq=1:aq-mode=3:qcomp=0.8
- crf=18-20 (motion + fancy & detailed FX),
- Movie-tier dark scene, complex grain/detail, and BDs with dynamic-grain injected debanding:
- crf=16-18,
no-sao:bframes=8:psy-rd=1.5:psy-rdoq=<2-5>:aq-mode=3:ref=6(rdoq2 to 5 depending on content)
- crf=16-18,
- I have infinite storage, a supercomputer, and I want details:
preset=veryslow, crf=14,no-sao:no-strong-intra-smoothing:bframes=8:psy-rd=2:psy-rdoq=<1-5>:aq-mode=3:deblock=-1,-1:ref=6(rdoq1 to 5 depending on content)
Side note: If you want x265 to behave similarly to x264, use these: no-sao:no-strong-intra-smoothing:deblock=-1,-1. Your result video will be very similar to x264, including all its flaws (blocking behavior, etc.).
Audio Codecs Guide
Why you should never use FLAC
Note: If your source isn’t FLAC/WAV/PCM, always passthrough (-c:a copy) to prevent generation loss.
FLAC, to put it simply, is very inefficient use of data. A typical anime (23-24min) episode will have a FLAC audio size of 250MB. Now compare to an AAC track of merely 20-30MB with basically no quality loss. And then there’s the issue of anime audio track being mastered well in the first place…
The preserving audio quality argument has always been the dumbest argument I’ve ever seen. I feel that this is partly due to the “audiophile” community blowing this issue out of proportion. Just yesterday I was on cough and saw a 24 episode cough that is 12GB large. The encoder argues that at this size the video had “barely any quality loss”. It was a re-encode at crf=22.5, with zero encoder tuning and preset at fast. Needless to say, it was blocking and artifacts galore. The icing on the cake? The audio was FLAC “to preserve audio quality”… I’m pretty sure there are more people in this world with 1080p screens than high-end headphones lol. The biggest mistake really wasn’t encoding with crf=22.5. Imo, it was the really imbalanced release. By simply using AAC you can allocate extra 4GB towards video quality with 99.9% people not notice any audio quality loss.
Note: The only exception to using lossless codecs is:
- You are in production using lossless codecs to prevent generation loss.
- Archival.
- Providing remux/RAWs for cough.
Being an audio enthusiast myself, I am a firm believer of double blind ABX testing, and I encourage people to find the lowest bitrate they can go before being able to discern the difference with this method.
I later provide audio samples (see Encoders Comparison section) from various encoders for people to listen. A great ABX tool I found is the ABX plugin for foobar2000 with replaygain enabled.
AAC or OPUS
OPUS
Ideally, one should use opus. It’s a open codec, and outperforms even the best AAC encoders at very low bitrates. CELT/SILK encoding mode switches on-the-fly with voice activity detection (VAD) and speech/music classification using a recurrent neural network (RNN), ensuring the best encoding method depending on content.
It also performs exceptionally well with surround sound. Say we want to target an equivalent quality of 128kbps stereo track (64kbps x 2 channels) on a 5.1 channel setup. Conventional codecs such as AAC simply use 64kbps x 6 channels = 374kbps (usually slightly less due to LFE & C channel being lows/vocals only).
OPUS on the other hand can achieve similar quality with a much lower bitrate, the recommended formula being (# stereo pairs) x (target stereo bitrate). In this case with a conventional 5.1 setup (L & R, C, LFE, BL & BR), we have (2 stereo pairs) x 128kbps = 256kbps. You may need to use the conventional formula if your stereo pairs aren’t “stereo” pairs, i.e. the audio is significantly different.
This is due to OPUS using surround masking and takes advantage of cross-channel masking techniques to smartly distribute bitrate. Think of HE-AACv2 but better and optimized for higher bitrate + surround setup. Instead of distributing 64kbps per channel, more bitrate goes to the stereo pairs and less to the center/LFE channels where only vocals/bass exist. Next, by utilizing joint encoding (intensity stereo) and other techniques it “increases” the “bitrate” per channel. Obviously this is an oversimplification and the underlying technology is way more complex, but you get the idea.
Sounds cool, right? Why not just always use this sci-fi level magical codec then? Well you see, we already do, but in the form of commercial implementation (FaceTime audio, Discord, Skype, etc.). Opus is not widely supported in many container formats (only in .mkv, .webm, .opus (.ogg), .caf (CoreAudio format)), especially in the video world, essentially limiting users to those using 3rd party players. This leaves us…
AAC
AAC. An old codec developed to kill mp3 and they (mp3) still exist for some reason. AAC is a widely supported codec just like mp3 was as its replacement. If a device can play music, 9/10 it supports AAC. Quality is about the same as Opus on higher bitrates. There’s also HE-AAC that’s used in low-bitrates (~64kbps) with spectral band replication (SBR) and HE-AAC v2 with Parametric Stereo (PS) that’s used in even lower bitrates (~48kbps).
I personally think that you shouldn’t use HE-AAC, especially He-AAC v2 as it’s pretty obvious with a decent studio monitor/headphone. If such low bitrate is needed, Opus is also much better.
Now that we’ve established AAC is the way to go for most users, now to the bad news: unlike Opus with 1 definitive official open source encoder, there are many encoders developed by many corporations for AAC, and some aren’t “free”.
Just like licensing issues plaguing HEVC, the same can be seen in the AAC world. This means without some computer knowledge, it’s pretty hard to your hands on good AAC encoders.
Now to introduce the 4 most prominent AAC encoders:
The first is qaac, an tool utilizing Apple’s CoreAudio toolkit to encode Apple AAC. Mac users: you have direct access to the CoreAudio library and do not need any special tools. Apple AAC is know to be the best consumer available AAC encoder.
Second in place is is Fraunhofer FDK AAC, developed by Fraunhofer IIS, and included as part of Android. While open-source and once used in FFmpeg, due to licensing issues it has pretty much disappeared from any builds. To get it back, you need to compile FFmpeg yourself and enable the non-free flag. Once compiled, the build cannot be shared or distributed.
(There’s also the FhG AAC encoder from Fraunhofer bundled in WinAmp but it’s another complicated topic for another day. Beginners to using AAC, just pretend it doesn’t exist.)
Third place is Nero AAC, once pretty prominent in the AAC world as it was provided by Nero themselves in their software. It is currently outdated and should not be used.
Last is the FFmpeg 3.0 encoder. AAC encoder in FFmpeg used to be trash, even at 128kbps it was hissing all over. The new improved encoder has “eh” quality and can be widely used with 1 caveat: it’s CBR ready only. The VBR is still experimental (although my tests show that it is not any worse than CBR, a.k.a. they’re both “eh”). I do not recommend any less than 256kbps (as you will see later).
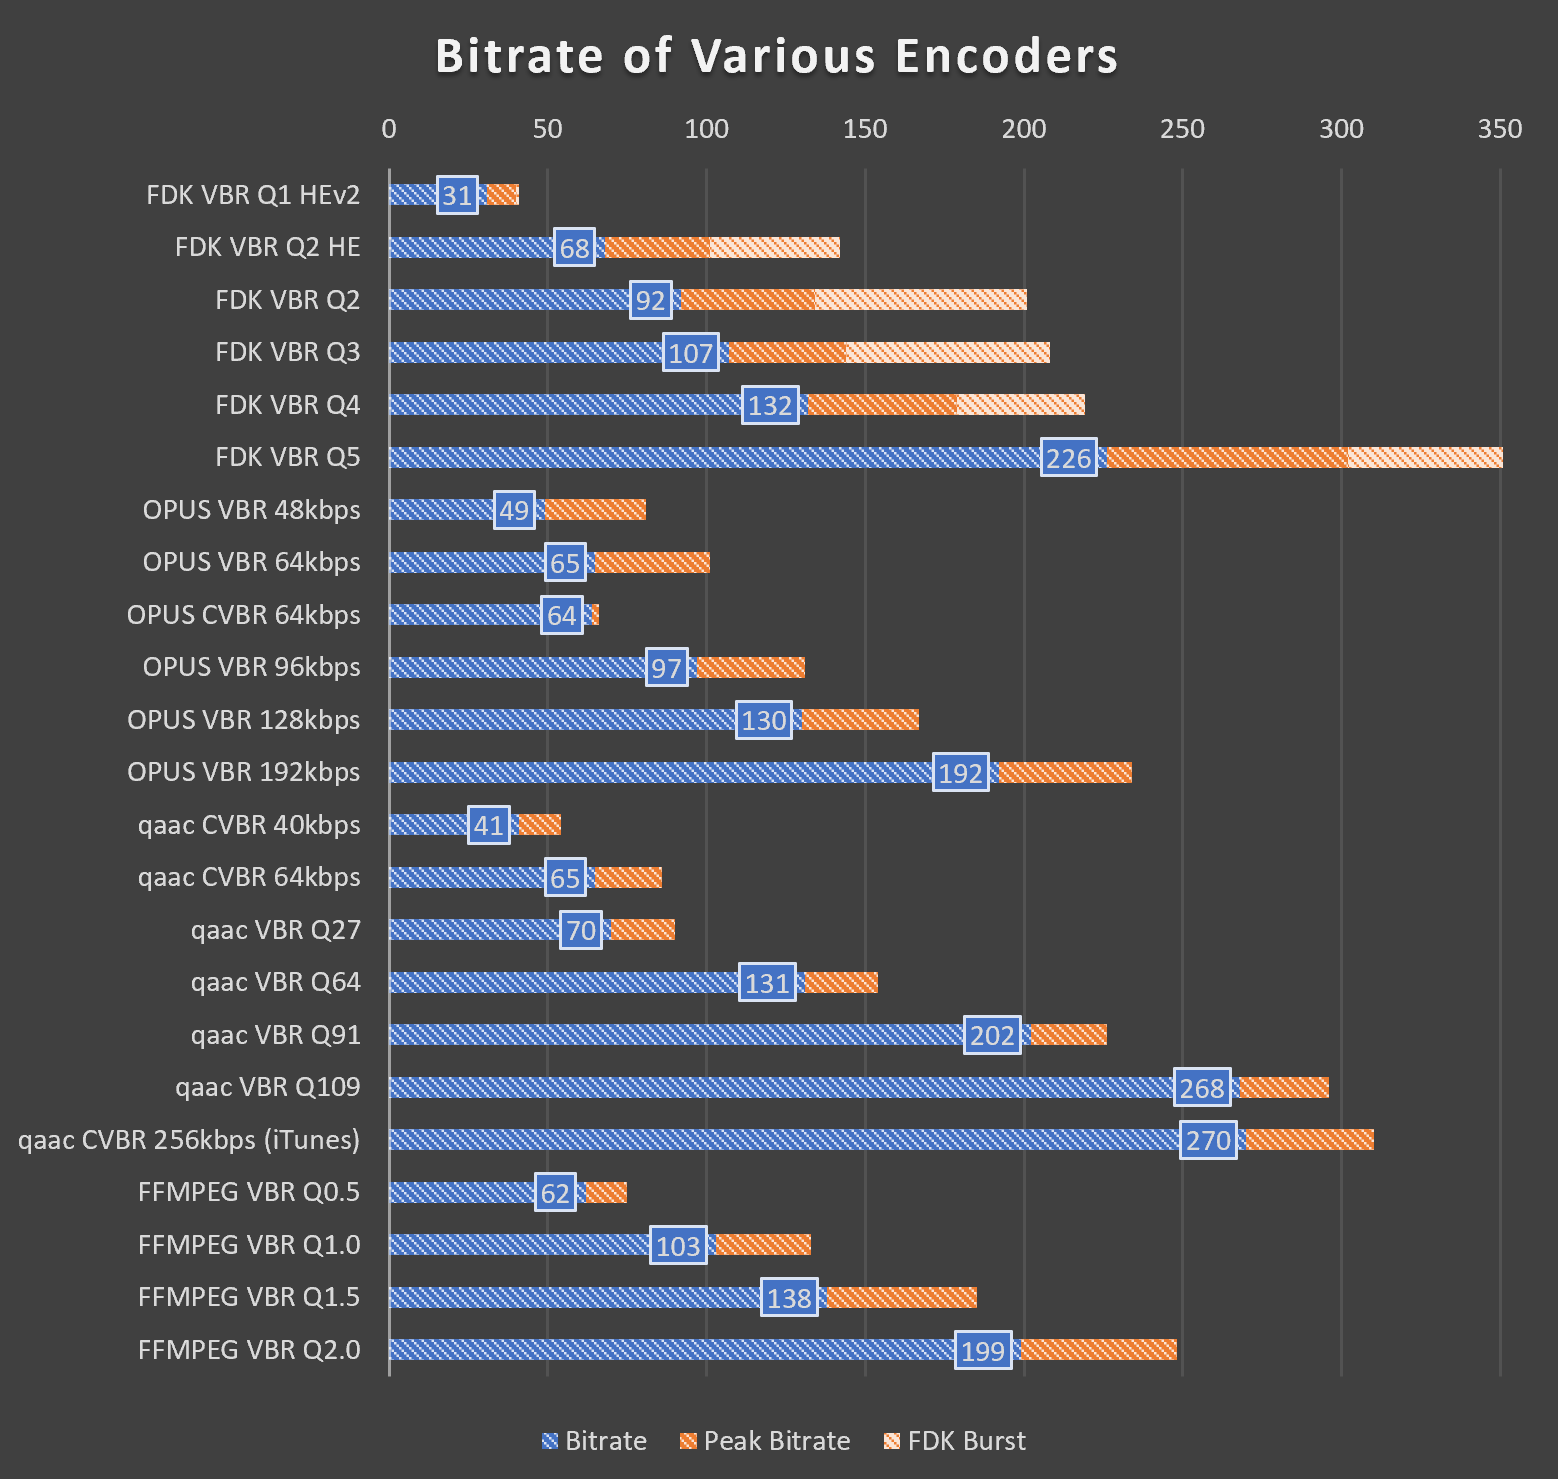
Encoders Comparason
My MEGA page contains all the audio file samples (backup link). Feel free to download and listen/ABX them. I chose the Z*lda theme song orchestra due to its challenging nature: brass instruments and cymbals. If anything will show a flaw in low bitrates, its going to be the trumpet. Basically, if a certain encode setting can handle this track, it can handle everything.
| Encoder | Size (Bytes) | Bitrate (kbps) | Peak Bitrate (exclude FDK initial) | FDK Burst |
|---|---|---|---|---|
| FLAC | 38745489 | 899 | 1201 | |
| FDK VBR Q1 HEv2 | 1341425 | 31 | 40 | 41 |
| FDK VBR Q2 HE | 2973163 | 68 | 101 | 142 |
| FDK VBR Q2 | 4051211 | 92 | 134 | 201 |
| FDK VBR Q3 | 4681758 | 107 | 144 | 208 |
| FDK VBR Q4 | 5812754 | 132 | 179 | 219 |
| FDK VBR Q5 | 9925912 | 226 | 302 | 351 |
| OPUS VBR 48kbps | 2131368 | 49 | 81 | |
| OPUS VBR 64kbps | 2841338 | 65 | 102 | |
| OPUS CVBR 64kbps | 2792245 | 64 | 66 | |
| OPUS VBR 96kbps | 4278459 | 97 | 131 | |
| OPUS VBR 128kbps | 5698682 | 131 | 167 | |
| OPUS VBR 192kbps | 8409104 | 194 | 234 | |
| qaac CVBR 40kbps | 1794573 | 41 | 54 | |
| qaac CVBR 64kbps | 2847934 | 65 | 86 | |
| qaac VBR Q27 | 3081110 | 70 | 91 | |
| qaac VBR Q64 | 5760371 | 132 | 154 | |
| qaac VBR Q91 | 8882577 | 205 | 227 | |
| qaac VBR Q109 | 11767124 | 272 | 296 | |
| qaac CVBR 256kbps (iTunes) | 11852276 | 274 | 310 | |
| FFMPEG VBR Q0.5 | 2701485 | 61 | 75 | |
| FFMPEG VBR Q1.0 | 4527582 | 104 | 133 | |
| FFMPEG VBR Q1.5 | 6049106 | 139 | 185 | |
| FFMPEG VBR Q2.0 | 8727091 | 202 | 249 |
FDK AAC
FDK AAC is probably the most accessible AAC encoder. It is built into FFmpeg and HandBrake (both require manual non-free compiling, go check out guides on the official site / videohelp / reddit how to compile HandBrake with FDK AAC. For FFmpeg use media-autobuild-suite. It being only ever so slightly behind qaac makes it the perfect encoder for ripping Blu-Rays without demux/remuxing.
Keep in mind anything other than Q5, all will have a low-pass filter, with it progressively lower the lower the bitrate is. I recommend using VBR Q5 due to its pretty high bitrate (~100kbps/channel), and to prevent the low-pass filter.
An interesting thing is that FDK tends to not respect VBR quality goal as well (i.e. VBR Q2 has a theoretical ~64kbps goal, but the result file is 92kbps), and allocate bits when it knows Q2 is simply too low for a specific file. This really isn’t an issue as on average FDK Q2 is indeed ~64kbps, just more of an FYI that FDK WILL throw more bits if a complex track needs it.
One “quirk” of FDK AAC is that it tends to allocate bitrate at the beginning for music (this is not a problem for anime as shown later) when it detects a complex beginning. This is why I do not recommend FDK AAC for music files as it tends to waste bits at the beginning adding up slowly. On the bright side over-allocation doesn’t impact quality (it “increases” actually haha).

Apple AAC (qaac)
While in a perfect world everyone should use the coreaudio encoder, the matter of fact is that it requires demuxing the file making FDK the best in terms of workflow in FFmpeg based programs. Some tools like Staxrip processes files as such, but for most this is very inconvenient. (Mac users: CoreAudio encoder can directly be used by programs like HandBrake).
Apple AAC is more suitable for music (as expected, since it’s the encoder used for iTunes). When encoding quiet tracks (such as movies) it often undershoots its bitrate target by quite a bit (which can be mitigatged by using a higher TVBR target or simply using CVBR). I really have nothing to say about it other than it’s really good, especially at low bitrates.
Apple AAC tends to respect bitrate targets much more than FDK AAC (with the exception of ultra low bitrates). It also favors allocating bitrate to music over speech.
Constrained VBR (CVBR) mode in Apple AAC constrains the minimum value to not go too low, but does not limit the upper value like that on Opus. Keep in mind CVBR encodes identical to TVBR if bitrate doesn’t drop below threashold. Funny enough, in the context of music tracks, CVBR behaves very similar to FDK AAC with an initial burst.

Opus
Not much really to say here. You really have to experience it yourself to understand what I mean by Opus really is the next gen codec. It pretty much has no major flaws, and multiple public tests have proven Opus to be pretty much the best encoder out there.
Its 2 self-switching encoding modes SILK/CELT also makes it perfect for both music and speech/vocal.
The only real down side to Opus (other than format support), is that it doesn’t have a quality mode and requires specifying a bitrate. For example, qaac Q91 has a target of ~192kbps. However, on complex tracks, it would not hesitate to go much higher just like the sample track provided. On tracks such as slice of life anime where much is just voice and quietness, the result bitrate will be much lower than 192. On the other hand, Opus pretty much always produces ~192kbps file. Additionally, qaac quality mode will base bitrate on per channel, whereas OPUS bases bitrate per audio track, meaning for OPUS you will have to manually set double/triple the bitrate for 5.1/7.1 surround sound audio encodes.
For streaming companies, Opus’s ability to respect bitrate so well is a huge advantage for networking and storage problems. For consumers like us however, this is a disadvantage as a quality mode would serve us much better. (Think of quality mode like crf in video encoders, huge file-to-file variation but ultimately equivalent quality for each file).
CVBR mode in Opus works different than those in AAC. Think of it as a VBR mode for CBR. It’s basically constant bitrate, but with a bit wiggle room for very small momentary bursts.
Opus also has a “soft” low-pass filter from 16-20kHz, and starts becoming progressively aggressive <96kbps. I say “soft” because it isn’t a hard-limit, but decided by the encoder depending on content. For example, in my test track even as low as 48kbps, when even HE-AAC is low-passing <13kHz OPUS still allows trumpet harmonics up to 20kHz. Opus also momentarily boosts VBR to ~50-55 kbps as the encoder smartly determined that low-passing the trumpet will be detrimental to the overall quality.

FFmpeg 3.0
Holy Jesus it’s bad. Anything lower than 256kbps produces farting noises with the trumpet (both CBR and VBR). Usually it isn’t this bad, but now you know why I chose this track to compare encoders.
On the bright side their VBR algorithm is pretty much spot on. Though according to their website VBR is still experimental and should not be used.

Encoding Audio for Anime
FDK AAC vs. qaac

Using Danmachi episode 1 as an example, you can see how both are really more similar than different. The only real takeaway is that qaac’s quality mode differs drastically with different content and really favors music (Q91 is ~192kbps for music, but in this case it undershot the target by a 30kbps margin). After using a higher quality target for qaac to compensate, you can see both have very similar bitrate allocation and variability, with the exception of the ED where qaac increases the bitrate compared to FDK AAC.
Opus vs. qaac

As both AAC and Opus are fundamentally different, we can’t really draw any conclusions from this.
One thing to note is that Opus really does respect bitrate targets VERY well. Oh and again, qaac loves to allocate bits to music over vocals (OP and ED peak).
Recommended Settings
All numbers in kbps.
| Encoder | Stereo | 5.1 | 7.1 |
|---|---|---|---|
| OPUS | 192 | 384 | 512 |
| qaac (Apple AAC) | -V 109 |
-V 100 |
-V 91 |
| FDK AAC | -m 5 |
-m 5 |
-m 5 |
| FFmpeg 3.0 | 384 CBR | DON’T | BOTHER |
| Notes | |||
| OPUS |
Remember to enable the --vbr switch unless you need CBR. If
your audio isn’t a conventional channel layout use the traditional
(# channels) x 96kbps formula, else use
(# stereo pairs) x 192kbps. Use
64kbps/channel or 128kbps / stereo pair if
more compression is desired.
|
||
| qaac (Apple AAC) |
Use capital -V for true VBR. -V 109/100/91 is
approx 128/112/96kbps per channel. -V 82/73/64 (~80/~72/~64
kbps/channel) can be used if more compression is desired. qaac tends to aggressively save bitrate for non-music content, thus a higher VBR mode is recommended to compensate.
|
||
| FDK AAC | Always use VBR Quality 5 to avoid low-pass filter. Q5 is approx 100kbps per channel. You may use Q4 (~64kbps/channel) if you don’t mind the low-pass filter. | ||
| FFMPEG 3.0 | I really do not recommend using this audio encoder unless it is stereo and a final compression render to upload to sites such as Youtube. | ||
Here are my general rule of thumb for audio quality vs. gear:
64kbps/channel for budget chi-fi gear (<$100 USD).
96kbps/channel for mid-fi gear (~$300-500 USD audio setups).
SnakeOil/channel for hi-fi gear ($1000USD+ setups). Jokes aside double-blind ABX test your limits, though I doubt anyone can differentiate past 160kbps/channel.
Conclusion
Thanks for reading!
Basically yeah, follow this guide and your encodes should be good. This is the end of the guide, but if you want to read my ranting about audio gear and stuff keep reading.
Bonus: Ranting on Audio Gear and Recommendations
I really do wonder to what extent people are able to ABX and discern the difference between compressed files and lossless. I personally have trouble beyond >96kbps stereo for most sources and beyond >160kbps I literally cannot tell the difference. I only own an HD 650 and Etymotic ER2/3/4XR so I do wonder what people with better gear can hear.
My journey into the “audiophile” world
Skip this section if you aren’t into my life story.
In middle school, just like everyone out there I owned a pair of V-shaped generic $20 IEM. The forgotten days where I though muddy bass=good, the days when a +20db bass boost was about right.
High school is when I had the first taste of “real” audio gear. My first IEMs were the RHA MA750s. Classified as a “warm” IEM with a ~10db sub-bass boost and bright highs, it was one of the best at its time in the $100 price range. Initially I though it was really bass-light (lol), and the sharp 10K made me not like it as much.
In University, following the trend with everyone I got the infamous HD650s, and also ventured into the tube amp world (full of regrets, tube amp = money pit, coloured sound, and eh detail retrieval on most tubes). Here is when I got to experience what ‘soundstage’ is, got more used to a ‘natural’ sound signature.
While searching for an IEM upgrade after my RHA crapped out, I stumbled upon Etymotic’s ER3 series. I always knew that they were the benchmark for studio IEMs, but never really though much of it until one faithful day for some god damn reason I ordered the ER3XR to try it out.
To my pleasant surprise, after spending a month with it and getting used to a neutral sound signature, I am really impressed. Listening to classical on it is nothing compared to other IEMs in terms of timbre and accuracy, albeit the single BA does sound a tad ‘dry’ sometimes.
Sound “Quality”
My biggest complaint/gripe with the audio world is that many tend to associate “sound signature” with “sound quality”. So once again, I would like to scream at the world:
“STRONG BASS ISN’T SOUND QUALITY. IT’S YOUR SOUND SIGNATURE PREFERENCE!”
Fun fact, stronger bass actually worsens sound quality due to the stronger bass often creating distortion worsening harmonic distortion (THD) measurements.
My Recommended Gear
(Below info relevant as of early 2021)
Part 1: IEMs
Beginners looking for recommendations for audio gear (IEMs): I highly recommend Etymotic’s ER2, ER3, and ER4 series, specifically the ER2XR for beginners (Diffuse-field flat with a +5dB bass boost). They definitely aren’t for everyone with their house-sound (Diffuse-Field Target w/ slightly weaker treble). However, for those who want a taste into what a truly neutral IEM sounds like, these are unbeatable.
For those not into Diffuse-Field tuning, I recommend finding headphones tuned to the Harman/modified-Harman 2017/2019 IEM target (more “mainstream”). I haven’t been keeping up with what’s best, but for the lower budget people chi-fi (Chinese-fi) is the way to go. Some recently popular brands in the chi-fi are Tin, KZ, FiiO, BLON, Moondrop, etc. Moondrop (2022) is especially hot on the radar these days, and other than it’s tuning which I dislike (but I absolutely understand that why everyone say they’re well tuned), I can attest to it’s sound quality from display units I tried. There’s also the 7hz Timeless for bassheads with planar drivers.
Fun fact: Etymotic invented insert headphones.
There are 2 variants within the ER2/3/4 series, the SE/SR and XR (i.e. ER3XR). SE/SR is the studio version, and the XR is the bass-boosted (+3db, or +5dB for ER2XR) variant. If this is your first time venturing into the neutral sound signature, get the XR variant. Get the SE/SR if you want a truly FLAT bass. Note that since the highs aren’t boosted like most mainstream IEMs, the bass is surprisingly present due to other frequencies not drowning it out.
The ER2 are the cheapest (~$125 USD) of the bunch and use Dynamic drivers (DD). They have almost identical frequency response to the ER3, but due to the dynamic drivers they have better sub-bass (2dB stronger), sound more natural, and bass packs more of a punch (likely from the slower decay of DD). If you listen to mainstream music, these are the ones to pickup. The value these offer are quite amazing at $125. I personally prefer the SE (non-bass-boosted) version.
ER3 uses a single Balanced Armature driver (BA) and are suited for people who listen to classical or similar genres, as it has better detail retrieval at the cost of bass sounding uh… a bit unnatural (difficult to describe, best way to put it is that it lacks impulse and dynamics). The ER3s are the best to get into the Etymotic house sound (~$130-160 USD). These are fine with non-fast bass (bass guitar, non-synthetic bass drums, etc.), but once a track gets too complex (i.e. in EDM or metal when every instrument plays + heavy bass hits) the single BA sometimes gets overwhelmed and bass starts bleeding into the mids. Those who are used to DDs might find BAs sound a bit ‘dry’. I personally recommend the SE version over the XR version for the ER3 due to it sounding more natural and less prone to bass bleeding into mids.
ER4 are the professional version of the ER lineup, and have a legendary history. They are manufactured in the States, with each unit having its FR and channel match certification. Get these if you want the best Etys can offer. They are a small upgrade from the ER3 so I do not recommend the ER4s if you already own the ER3s. For the ER4 I recommend the XR over the SR variant which is opposite of the ER3 recommendations due to much better bass control.
The Etys use their infamous triple-flange eartips that may not be everyone. Fortunately due to their long nozzle design using foam tips do not alter the frequency response (Innerfidelity has proven this). I personally use Comply foam tips with them. There are also many aftermarket tips that fit them such as the Spinfits CP-800.
Totoally not payed by Ety to say this.
Part 2: Full-Sized Headphones
As a brief summary: closed back headphones have better noise isolation, open back leak noise but often have better soundstage.
I haven’t been keeping up in this market segment for years, so it’s up to you to research. Some big name brands in no particular order: Sennheiser, HiFiMan, Audeze, Beyerdynamic, Audio Technica, AKG, Grado, Fostex (LOTS of derivative ‘brands’ from modded T50 series), Focal, Philips, Sony, etc.
One thing to keep in mind is that full-sized headphones are often harder to drive (especially planers, don’t let the low impedance trick you) and require a dedicated amp.
Part 3: DAC/AMP
Note that new products come out every month so you should always do your research.
Also be very careful, other than cables, DAC/AMPs are the most prone to snake oil claims. Many might know the legend NwAvGuy who one day stormed into the scene, created an open-source Objective 2 AMP/DAC design that outperformed competition 10x its price then disappeared without trace. His story is a long one reserved for another day, but thanks to him modern gear are mostly more about objective measurements than subjective claims.
I usually search for an amp that is suitable for 1.5-2x my headphone impedance. This is due to headphones impedance are measured at 1KHz, whereas often the impedance isn’t linear throughout (stares at Senns). (Example: HD650 is rated at 300 ohms but its peak resistance is 500 ohms at 80Hz.) Update: RIP innerfidelity, hopefully someone has that link archived somewhere
Portable DAC/AMP rarely are powerful enough to drive 300 ohm class headphones. Amps that do are probably bad at driving low impedance IEMs (volume matching, output impedance problems, etc.). It’s basically pick your poison and finding you needs.
For IEMs: Your goal is to find an amp that is clean (high SINAD) and quiet (low noise-floor). Try find the lowest output impedance possible using the 1/8 (or 1/10) rule: the output impedance of your amp should be 1/8 or 1/10 (depending on who you ask) of your headphone impedance. Typically this means looking for <=1 ohm for IEMs. Portable amps often work well due to them being battery powered (clean DC power source). Digital DAC volume control is a plus to ensure channel matching.
For high-impedance headphones: Your goal is to find something that does well at high gain with low distortion. Output power calculators (Site 1 & 2) are your friend. You often find people complaining about weak/flabby/distorted bass on such headphones and a weak amp is probably the cause.
Recommendations
Crossed out some devices. I have not been keeping up with the scene now that I’ve found my end-game: the Apple Dongle. Yes, I’m dead serious.
- Uber Budget: Apple USB-C to 3.5mm Dongle ($10)
- No, this isn’t a joke. Make sure you get the US version, as the EU version is weaker and doesn’t measure as well due to reasons (EU volume limit shenanigans). These measure insanely well for $10 (99dB SINAD / 113dB SNR), and are perfect for even end-game IEMs due to it being really clean and non-existent noise-floor. Suitable for <50ohms IEMs / non-planar headphones. Can be used on Windows with no problems, although Android users may have volume issues due to a config bug (can be mitigated by using exclusive mode such as USB audio driver app).
- Bluetooth:
EarStudio ES100 ($100)Not sure what’s good these days. - Budget Desktop DAC/AMP Combo:
FiiO K3 ($100)Designed to replace the infamous E10K. While measurements aren’t the best in 2019, it packs a lot of functionality (Optical, RCA, etc.) and is pretty good for its price for an all-in-one. Also has an actually good 6db bass-boost switch for watching movies (6db bass boost on D-F tuning is close to Harman target’s bass’s 7db boost). Recommended for <150 ohm non-planar Headphones and IEMs.
- Budget Desktop DAC/AMP Combo (More Power):
FiiO K5 Pro ($150)Has a surprisingly good AMP and OK DAC. Can even drive the HD650s well. Basically a much more powerful desktop K3 that can drive ~300ohm / planars with no problem.
- Budget Portable DAC/AMP Combo:
Topping NX4 ($160)Pretty much better measurements than the FiiO K3. Can even drive the HD650s. However, QC isn’t as good as compared to FiiO.
- Mid-Range Desktop DAC/AMP Combo:
Topping DX3Pro ($220)A really good all-in-one unit with good measurements. Not as good as separate DAC AMP units but for functionality (BT, preamp, etc.) and desk space friendliness it is unbeatable. If you get the newer v2 LDAC version, unfortunately its output impedance is 10 ohms so make sure your headphone is >80 ohms (1:8 rule).
- Mid-Range DAC & AMP units: JDS Atom AMP/DAC ($100/$100), Schiit Heresy ($100),
Grace SDAC ($79), Khadas Tone Board ($100), or similar products (e.g. SMSL/Topping DAC/AMPs)- These are popular entry-level single units. There are also many good Chinese DACs in the $100 price range, although it might be more of a hassle to acquire one (Aliexpress, warranty issues, etc.).
- Upper-Range SE DAC/AMP: JDS Element II ($399)
- The AMP unit is very good (the Atom was derived from this unit during research). The DAC chip is definitely the weakest link in this unit. However, if you need a nice looking DAC/AMP and don’t care for balanced connectors, this is still a very good choice. You’re definitely paying some premium for the looks though.
- High-End Stuff: I will refrain from recommending anything specific, but here is a random list that might interest you. Always do your own research and never blindly trust strangers.
- Massdrop THX AAA 789
- ADI-2-DAC
- SMSL SP200 THX
- SMSL SU-8 v2
- SDAC Balanced
- Schiit Modius
- Topping DX7Pro
- Other brands: THX powered AMPs, Chord, iFi, etc.

Thank you so much for this article. I want to save space with H.264 encoded animes. I will try your audio and video settings. Very informative and useful, thanks again for sharing your knowledge ! 🙂
LikeLike
Excellent guide man. I’ve been encoding anime for quite some time now, but it always seems like there’s something new to learn and optimize. Didn’t dabble too much with x265 settings but recently needed to due to a scene with lots of grain. I’ve been following your work on a certain cat website and have been learning a lot.
LikeLike
Very informative and excellently written! Thx for the detail Information. I have a question. What do you understand by „Anime“ ? Do you also include 3D Animation? I‘m asking in case I‘m currently encoding Star Wars The Clone Wars. It is an animated Series. Can you please give me some Tipps for good encoding parameters?
LikeLiked by 1 person
Thanks for the great guide!
If you have a GPU that supports NVEnc, the encode speed is significantly faster at the cost of size and quality loss (dunno how much, further testing required). Does anyone have experience with GPU-accelerated encoding?
I just compressed a 2GB episode of “Emiya-san Chi no Kyou no Gohan” to just 880MB (still large for a SoL that’s 13min an ep), and it took a mere 2 minutes using a 2060 Super. The same encode using x265 took 30+ minutes and heated up my room like crazy (8700k 5.1ghz OC), but shrunk the file to 330MB.
I have plenty of storage but need to save a bit of space before buying new drives, so this would definitely help out without giving me a heatstroke and make churning through my whole library faster, especially for titles that don’t require archival quality.
LikeLike
Speed, Quality, and File Size. Out of these 3, you may only choose 2. That’s how encoding works.
The NVEnc encoder on the latest RTX/16xx cards have quality and file size comparable to the faster profiles on x264. However, it’s still behind the slower encode profiles such as veryslow. Not to mention even x264 allows many advanced tuning that we can tailor towards Anime. Compared to x265, its literal advantage is just encode speed (though by a huge margin).
Ultimately, it’s your choice to make what you want to prioritize.
LikeLike
Very good and detailed guide. Even though half of the things understand I enjoyed reading.
LikeLike
God tier guide, thank you so much for this! Are you planning on making a guide for AV1 once the codec as matured enough?
LikeLike
x265 took me 3 years to master, and that’s after it matured. I’m pretty excited for AV1, though it’ll gonna be a while before I adopt it (device support).
LikeLike
Hi there, what software do you recommend for encoding? is Handbrake fine or should I use something else? (maybe command line? It doesn’t need to have a GUI at all costs).
LikeLiked by 1 person
Handbrake is great for beginners.
LikeLike
try Staxrip.
LikeLike
Truly! An amazing post! But you should have also explained how you should always use VFR when dealing with anime (and also setting it to same as source.
Explanation: https://forums.animesuki.com/showthread.php?t=34738
LikeLike
Blue rays have constant frame rates these days so I isn’t a big deal anymore.
LikeLike
It was really instructive and will save me so much time of testing. I’m very enthusiast to find such a encoder guy with the same vision as mine. I must be one of the few persons in the world who don’t use any GUI, everything is done by scripted batch files. Maybe you’re doing the same ? Anyway, I’m preparing to release only HEVC encodes (I do fansubbing) and forget about AVC. Most of devices nowadays can read h265 videos so I think it’s time to evolve ^^.
Thank you.
LikeLike
Thank you for this guide!
LikeLike
wow, this is very detailed analysis. Thanks for taking your time doin this.
LikeLike
Great guide 😮 do you have discord?
LikeLike
Nope
LikeLike
Oh sry, no way to contact?
LikeLike
Greetings,
Can I skip adding constrained-intra if re-encoding a high quality encode? I’d rather not risk having encoding errors or having artifacts from the source amplified.
Thanks.
LikeLike
On you. I’ve only ever seen the error once.
LikeLike
linux handbrake can do protected dvds i think. otherwise it was a cool article, i will probably never do encoding on my own but for some reason i like reading this stuff
also i despise sites that use flac over streaming, since my internet is too slow to load the video in the first place most of the time, it just makes it worse
LikeLike
aq-strength default is 0.4, you have written it as 1
LikeLike
Ok sorry it seems it’s set to 0.4 when using tune animation
LikeLike
what best setting, especially for preset & tune for crf=31?
i wanna make like this.. http://www.mediafire.com/file/0yu1rynd36xebwc/MoeNcode_Yuru_Camp_-_07_AT-X_1080p_x265.mkv/file
LikeLike
You can actually view the media info of the file to see what settings were used. Rule of thumb for high crf is artifact suppression as high priority. Details shouldn’t be your main concern at such low bitrates.
LikeLike
Great guide man. If I may pick your brain for a moment, regarding grainy and/or dark anime (as in, grain is a major part of the show) and the settings that seem to affect it the most (psy-rd, psy-rdoq, and aq-strength), I have two questions.
Firstly, could any of these settings be turned down in order to remove grain without effecting the underlying image too much, and if so, which would be best? Or should you just stick to using a filter?
Secondly, if I don’t necessarily want to remove the grain, but still want to increase efficiency of the encode in the best way possible, which SHOULD I turn down?
LikeLike
Not much you could do, it’s just a delicate balance between preserving grain or flattening/thickening them to the point where they’re blurred out. On the really advanced level encoders do split scene encoding to achieve maximum efficiency, but that’s out of the scope of this article and my expertise.
LikeLike
Always resample to 44.1 kHz when using FDK-AAC, at least when using quality 3-5, on lower quality settings 32 kHz might produce better results, unless you’re using HE-AAC or HE-AAC v2, in which case you want to stick with 44.1 kHz.
48 kHz for FDK-AAC is only recommended at insanely high bitrates.
https://wiki.hydrogenaud.io/index.php?title=Fraunhofer_FDK_AAC#Recommended_Sampling_Rate_and_Bitrate_Combinations
Personally I only use FDK-AAC quality 5, and Opus when I want lower file size.
LikeLike
I advise against resampling to avoid potential aliasing artifacts from a bad conversion, unless at extreme low bitrates (<64kbps), though there is an argument for 32kHz at ~64kbps. There is also no reason to resample for higher bitrates; introducing rounding errors, or even aliasing artifacts from a bad conversion isn’t worth the slight compression gain.
LikeLike
Resampling audio, even with a very basic resampler, generally produces much less artifacts than encoding to a lossy codec at any bitrate.
There is a reason why Opus always resamples everything to the 48kHz it was tuned to. And why YouTube always resamples the audio to 44.1 kHz before sending it to the AAC encoder.
Of course, not resampling between 48kHz and 44.1 kHz won’t make that much of a difference because 48000 is less than 10% more than 44100, so even an encoder purely optimized for one of the two will produce good results at the other sampling rate.
But still, resampling 48kHz audio to 44.1 kHz before sending it to the FDK-AAC encoder should always have a positive effect on audio quality or compression efficiency at common bitrates.
LikeLike
Actually, very basic resamplers like Linear or ZOH do have an audible effect on audio quality. But Handbrake uses something better, I did some direct comparisons.
LikeLike
Nice guide. Apparently Opus is now supported by MP4 (see https://mp4ra.org/#/references and https://en.wikipedia.org/wiki/Comparison_of_video_container_formats). I did some testing and was able to playback the resulting file with MPV, VLC and even Firefox.
Isn’t this the kind of support Opus needs to make a breakthrough?
LikeLike
It’s good news, but webm has supported it since forever in major browsers. As long as Apple doesn’t support it opus will never gain traction.
LikeLike
Hi ! I’ve also been experimenting a bit with x265 for years (not as much as you though), and I’d like to have some more explanation on this :
“There is no simple answer to fix these 2 problems due to crf targets. Traditionally in x264 such scene will simply end up in blocking artifacts. x265 chooses to eliminate artifacts at the cost of detail loss. The down side is that even at lower crf targets it is tough to eliminate x265’s tendency to blur. To truly eliminate such effects, you will first need no-sao:no-strong-intra-smoothing:deblock=-1,-1 to make x265 behave more like x264, then raise psy-rd and psy-rdoq accordingly (2 and 5 respectively should do the trick). ”
How much loss is there with x265 using a crf target of around 16-18 ? Because in the picture right under that, you’re showing what kind of artifacts we can expect, but it’s cropped like crazy and you’ve applied some filters for us to see it more. In motion though and at normal viewing distance, nobody could see this, so I don’t quite grasp the issue. Also, I think it would’ve been better if you explained what artifacts we can expect from x264, or a comparison of some sort (via a link would’ve been enough), because just with your tutorial, it’s difficult to understand what should be done ultimately.
For example, you started to make me doubt a bit more about x265 than before, because if it permits to hugely save space but introduces other artifacts and detail loss, what’s the point in the end for a quality compression ?
Also, I’ve been using Opus for quite some time because of the sound quality compared to classic AAC, and it really is a gamechanger. Even a low cost samsung tab 2 from 2012 have absolutely no issues playing Opus files (well the sound circuitry is terrible, it was only to test how far it can work), and every modern $150+ smartphone from at least 2016 should be able to play them without any issues, so that’s great. The only thing that can still hold back Opus is the lack of support in some old amplifiers, but from now on it’s not really an issue.
My personal setup is a Topping DX3 Pro, a HD 650, a Hifiman Sundara that I just bought and a DT 880 600 ohms that I’m likely to sell, but there are a ton of them on the second hand market in my country, so I’ll probably just keep it.
LikeLike
> How much loss is there with x265 using a crf target of around 16-18
Barely any at ~16 with proper tuning, but ~20 you start seeing them. I used a single image cause I was too lazy to find proper examples for both, people just neded to get an idea what it looks like. For a proper example, Kimetsu had multiple scene where the glowing sword had banding, and SAO S3 has a severe grain blocking problem (e.g. ep3 beginning).
> I think it would’ve been better if you explained what artifacts we can expect from x264, or a comparison of some sort
I assume people are familiar with such artifacts, as it still is the dominant codec used on the internet for the past decade.
> if it permits to hugely save space but introduces other artifacts and detail loss, what’s the point in the end for a quality compression ?
It’s simply tradeoffs and quirks of different codecs. One thing is for sure though, size for size at extreme conditions, the blur mechanics and better algorithm of x265 make it look significantly better than x264. The point of the argument was if you hated x265 and don’t mind bigger file sizes, just stick to x264.
> The only thing that can still hold back Opus is the lack of support in some old amplifiers, but from now on it’s not really an issue.
And like a crap ton of smart TVs. Opus’s true advantage is surround sound, except most of the time ARC/eARC only supports Dolby formats, and optical uses antiquated AC3.
LikeLike
Any change to your advised settings since the release of HandBrake version 1.4.0?
LikeLike
Not really, x265 is very stable now it’s unlikely to change.
LikeLike
Thanks for well researched thoughts, especially on HEVC speed choices and Opus. In the chart where you wrote in DON’T…..BOTHER. I lol’d.
LikeLike
xD
LikeLike
I have an anime with E-AC-3 audio at 224 kb/s, is it worth to convert to opus?
Thanks a lot for your info.
LikeLike
Probably not.
LikeLiked by 1 person
Wasn’t aware of the differences in AAC encoders prior to reading this. Would you happen to know what Premiere/Adobe Media Encoder use for their AAC options, or if they or other NLEs on PC have good AAC encoders?
LikeLike
They should be alright, though no one has had listening tests yet due to them being commercial encoders. I do expect them to be worse than Apple AAC though.
LikeLike
Hi, Guten Tag,
I generally like the write up. But CRF 19/20 and lower starts to defeat the purpose of 265, which was to get insanely high compression at similar quality of 264. For example, encode a 1080p anime episode at CRF 20 using 264 then do the same thing but with 265 @ 24 CRF. The second encode will be similar or better quality while being much smaller in size. Basically, my only real problem with your review or guide is that the CRF values are more for 264 because at 19, 20, 18, 16 etc, 264 starts to close the gap in quality and compression ratio as it does better with more bitrate.
My only other complaint about the guide is that the extra adjustments are IMHO and from experience, a placebo. I like the indepth take on the meaning of what the adjustments do, but ultimately placebo. Maybe if you include screen shots of your best examples …
Side note, I got a 14.4gb slayers movie down to 393mb (720p, x265, slow, 24 CRF, animation tune, opus 96khz, pro logic II) and I can’t tell the difference. (for the record, 1080p would be just a few hairs over 500mb, but is 33% slower at encoding vs 720p). This is the magic behind 265. Ultra low file size with high quality video.
LikeLiked by 1 person
You bring up many good points, and at the end of the day, I tell people to test what they like. As I said in the crf portion of the article “If you can’t see the flaw without pausing, is it really a flaw?”.
While I recommend crf 20-23 on smaller screens/devices/TV, you’d be surprised how easy it is to spot artifacts on a 24”+ screen or a tablet. While increasing the bitrate on x265 seems pointless, anything over crf 16 still has a lead over x264, especially with much better 10-bit encoding and support.
As for the extra adjustments, they *mostly* are useful. A few of them such as ref are in the region of “magnifying glass”, but numbers don’t lie and every bit counts. Especially PSY and AQ options, those are important and were also crucial in x264. A final encode with and without tuning is quite obvious, though whether the tuning is to your liking is more on the subjective side. I found NGNL Zero a great movie to test this stuff, back in the days I used the fallout opening scene to tune x265 and learned the options.
LikeLike
I can attest to the AQ tuning at the very least. I dropped about 200MB off of my episodes just by changing the aq-strength from 1 to 0.8.
YMMV depending on what you’re encoding though, I guess.
LikeLike
Well, I suppose I’ll ask here since there’s a surprisingly low amount of posts regarding this.
How do I get rid of banding that’s already present in the source? I’ve got some BDs with a ton of microbanding whenever there’s a colour gradient (which is every single colour). Just trying to make a genuinely good encode for a series I love.
LikeLike
Filtering. However public deband filters are currently rather dated and don’t work very well. There are some encoding groups with really nice deband scripts but I don’t know what they are. Personally I just enable debanding while watching videos, as filtering is a complex workflow.
LikeLike
Does what you said about AAC apply to decoding? For example Would playing back the same AAC file sound better on an iPhone vs an android even if the android had a better DAC?
LikeLike
I dislike the explanation of psy-rd and psy-rdoq, I think it’s partly wrong.
psy-rd and psy-rdoq are not directly interdependent. psy-rd shifts focus between maintaining visual energy and keeping rate distortion low. So increasing the value will better reproduce grain and other high frequency detail, at the expense of other quality metrics. So far, so good.
For psy-rdoq, however, a larger value will not simply give more bits to areas that lack visual energy to better reproduce its content. Instead, it seems to merely generate high frequency detail if an area lacks it, without much regard for structural accuracy. Higher values don’t make that generated “noise” more accurate, instead visual energy rises above the level of the source. In a test encode I did, a psy-rdoq value of 2 very visibly increased the total amount of grain compared to the source. For high quality encodes I would recommend to not use a psy-rdoq value of higher than 1.5, if your goal is visual transparency.
LikeLike
Yeah your explanation is way better, I was trying to dumb it down too much. I did (I think?) mention that that the grain preset rdoq is too high creating grain out of no where.
Recently due to BDs using H.264, there’s a trend with anime studios injecting dynamic grain to combat banding. The high rdoq values of 2-4 are due to this. Newer BD releases at 2019/2020 when I wrote this guide was especially filled with these grains, which prolly influenced my recommendation. But yes, I did mention to stick with the default value of 1 and only move up when better grain retention is needed.
LikeLike
You did actually mention it,
“psy-rdoq is the key to preserve grain (and also quite aggressively lowers QP). Keep in mind the –tune grain x265 built-in actually has too high of a value for slower presets, as it actually artificially creates even more grain. ”
“and too high psy-rdoq may also create artifacts”
Must have overread/misinterpreted/forgotten it.
The sentence that contributed most to my misunderstanding was this one:
“psy-rd will decide the tendency to add extra cost (bitrate) to match source visual energy (i.e. grain, etc.)and psy-rdoq will control the extent of this extra cost.”
This seems pretty wrong, because psy-rd works even with a psy-rdoq value of 0; any psy-rd value higher than 0 will always make x265 spend some extra effort on areas that do not match the visual energy of the source.
The sentence is directly followed by another mention of too high psy-rdoq values causing extra noise though:
“Too low and details will be blurred to improve compression (the reason why people hated x265 in the early days), too high and you create artificial noise and artifacts.”
The recommended settings, especially the last two, are a bigger problem to me though. Once you move towards visual transparency, you should lower psy-rdoq again, not raise it, because a noticably increased visual energy, caused by high psy-rdoq, will make the otherwise transparent encode intransparent again, and I assume that any value of higher than 1 has the risk of overshooting the source’s visual energy. So, as I see it, at extremely low crf you want to keep psy-rdoq at 1, and maybe raise psy-rd instead.
High psy-rdoq values seem to be mainly useful to make improperly recreated grain look more “grainy”.
In general, psy-rdoq seems to be the cheaper method to increase visual energy.
LikeLike
I’ll edit it to make it clearer when I have time. The high rdoq recommendations are based on current popular use of dynamic grain, I’ll clarify it in the edit. Based on my last test about 2 years ago, a value of 2-4 is still needed in dark scene for crf 16 to keep up with the dynamic grain injected depending on how the BD is mastered.
LikeLiked by 1 person
Interesting, would not have expected that. I never really looked at the effect of psy-rdoq on grain in very dark areas.
LikeLike
Say if I set psy-rd=2 but leave psy-rdoq=0, can blurring can be negated, even if partially, by lowering the Rate Factor by one level?
LikeLike
Possibly, just try it on whatever you’re encoding.
LikeLike
psy-rd just shifts effort to areas with lower visual energy than the source, at the expense of other metrics.
psy-rdoq is basically a cheaper way to increase visual energy in areas that miss visual energy compared to the source. In my experience psy-rdoq 1 tends to undershoot subjective visual energy, psy-rdoq 2 sometimes overshoots. With lower crf, psy-rdoq will have less and less of an effect.
In short: higher psy-rd will make blurry areas look better at the expense of other areas, and psy-rdoq basically just masks blurry areas with grain.
LikeLike
Is rdoq-level related to psy-rdoq? Does setting rdoq-level at level 1 or 2 matter if psy-rdoq=0?
LikeLiked by 1 person
Yes, it is related. But still, changing rdoq-level between 1 and 2 will change encoding even when psy-rdoq is set to 0.
LikeLike
Thanks for the clarification.
LikeLike
Incredible write-up. I absolutely loved reading that. If you were going to encode a movie from a lossless source, and you want to preserve as much detail of the original source like grain. Would you basically turn off sao, no intra smoothing, and either turn deblock off or use a very low deblock? Also, psy rd, at 2 seems fine right for grain, are there any other settings that control blurring or detail? Thanks, I’d love to see another article like this again, smaller and more focused on specific like I’m talkiing about, detail and blurring only maybe? Thank you
LikeLike
You’d also have to turn down crf to actually prevent artifacts. You’ll also need to tune psy-rdoq. No plans for an article, I’ve quit the encoding scene for a while now, and AV1 is coming out anyways.
LikeLike
Have you really quit the encoding scene? Really want to hear what you think of AV1 as of now.
LikeLike
After seeing some of the microbanding issues myself. I tried everything to overcome it, and I think Ive found a fix..
aq-mode=3:aq-strength=1.6
This completely removed microbanding for me. I’d like to see if this helps anybody else completely remove banding in scenes also.
LikeLike
Why anime streams still use aac instead of opus if it’s that superior? Browsers/mobile apps should support it just fine.
LikeLike
Thanks for this quite long and detailed guide. I loved it as it’s very informative. I used this information to convert some stuff for my Plex (actually moved to Jellyfin now) server to avoid stuff having to transcode for some of my devices.
I’ve seen discussions about some issues existing when encoding to or from Opus because of channel mapping. Is this the case? I don’t remember seeing it mentioned in the guide. Granted most anime is 2.0 anyway, but increasingly 5.1 seems to be appearing on BD releases.
LikeLike
Opus is nice if you have a device that can properly decode it, otherwise AAC is still preferred if you are worried about potential decoding issues. The file size different is marginal anyways.
LikeLike
Hello, this guide is pretty cool, helped me understand x265 a lot more. I was testing around and saw that using a 10 bit depth instead of 8 bit changes the colours very slightly. I know this is an anime encode guide but I was just confused about the colour change and was looking for some insight. A comparison linked below :
https://slow.pics/c/QIfTeE98
LikeLike
I can’t seem to see any color difference both on my PC and phone. Do you perhaps have a wide gamut display and somehow 10-bit is being decoded incorrectly on your system?
LikeLike
My display is not wide gamut and I think it only gets upto 8 bits. I looked at these screenshots on my phone in its srgb and dci-p3 modes both and saw that there was still that difference.
The thing that was the most different (or at least caught my eyes) was the colour of Saul’s face and also his suit. The face’s pink/red-ish ness was less and the suit was a tad bit greener.
Maybe I’m just looking too much into it. I just wanted to make an encode that was 98% close to the blu ray remux, at least to my eyes, then just watch that. I just did some quick “very fast” encodes to find out what the problem was and saw that the problem got fixed when encoding in 8 bit. I’ve always seen this slight difference in colour when encoding anime or live action. Never thought too much of it but was surprised to find out it was caused by using 10 bit depth (At least I think so). Anyways. I’ll just stick with the encode. I’m getting results that are nearly indistinguishable for me at half the size and that’s more than enough for me. I can’t even see the colour difference in normal viewing anyways. Cheers mate.
LikeLike
I think I see it, specifically it seems your 10-but encode is much more “blurry” the color orange is being blurred with the dark texture making it less saturated. A few questions and things to try:
– What tool are you using to encode, and what are you using to extract the frames? Are they handling 10-bit properly?
– Try a near-lossless or lossless encode with x265 10-bit (something like preset=slow crf=0 tune ssim, or even —lossless) and see if it’s the compression that’s causing the issue, the the 10-bit encoder itself.
LikeLike
you should make some presets for handbrake and xmedia recode for anime
LikeLike
As of x265 3.5, 8-bit, and with 1080p live action movies (not testing anime), aq-mode=3 instead of 2 does not improve the transparency of the encode, in a way that lowering RF won’t to better.
Settings:
x265 8-bit,
Preset Slower,
Tune None,
Profile Main,
Level 4.1,
–no-sao
John Carter (2012), BD 1080p, AVC, 1:34:30-1:35:50
aq-mode=2 (default):
RF 19.0, 6347 kbps, VMAF 96.35
RF 19.5, 5576 kbps, VMAF 96.10
RF 20.0, 4906 kbps, VMAF 95.84
aq-mode=3:
RF 20.0, 6344 kbps, VMAF 96.20
This was also the case testing other BD 1080p live action sources (with the same settings)
LikeLike
aq-mode=3 increases dark scene bias, I’d argue even in non-anime content you should enable it. Is your VMAF movie average? You usually want to only encode a specific scene to compare VMAF, or ideally do a frame-by-frame analysis. Comparing overall average is kinda useless in this context.
The difference with crf=19 vs. crf=20 + aq-mode=3 is that the former increases overall bitrate, whereas the latter doesn’t change bitrate of brighter scene much, but increases dark scene bitrate much more. So if you compare a static bright scene, the crf20 encode will have a lower bitrate, but when you get to a dark scene, the crf=20 encode will have a higher bitrate than the crf=19 one. Thus the more dark scene a movie has, the average VMAF will slowly climb, vice versa. Hopefully the explanation is easy to understand.
LikeLike
Here’s a great too to do VMAF analysis between clips: https://github.com/fifonik/FFMetrics
Side note: I’d use the 10-bit x265 encoder. No reason to say no to free space savings and to avoid banding.
LikeLike
That was a great guide for x265 encoding! Are you planning to make one for SVT-AV1 too any time soon?
LikeLike
Sorry, no. Don’t have much free time anymore so I no longer encode my own collections.
LikeLike
This is an excellent article but I’m a purist. By that I mean the video and audio that comes of the optical disc is how I watch it. I’ve never re-encoded anything that I upload as I only do bd and dvd remuxes.
LikeLike
Raw providers praise be.
LikeLike
Would you say this review is still up to date/correct? Or the encoder changed drastically, as in important new commands got added?
LikeLike
x265 is pretty mature. There won’t be any major changes.
LikeLike
I’ve found that psy-rd=1.57:psy-rdoq=0.00:rdoq-level=2 is excellent for Anime. Gives exceptional detail when no-deblock:no-sao:no-strong-intra-smoothing is used.
x265 is changing over the years, and I now think that aq-mode=3:aq-strength=2.0 is a perfect solution for banding and micro-banding. However, if it is film-based content with film grain then aq-mode=0:aq-strength=0.0 is far better for grain consistency.
LikeLike